
Photo Credits: Pixabay
Instagram is growing popular every new day and the Instagram team is always working hard as well to come up with new features that make ‘Instagramming’ easy.
As a social media marketer, or a general social media user especially if you use the most of Instagram to promote your brand, there are probably a number of hacks that Instagram will not tell you about even if you keep close tabs on the new feature updates they always provide.
This guide aims at giving you a deep insight into all the hacks, updates and features revolving and evolving around Instagram. If you happen to master them, you will ‘Instagram’ like a pro.
We will break the hacks into six categories and discuss them in details.
General Instagram Hacks
1. Create/Add/Manage/Use Multiple Accounts
Instagram, unlike initially, has made it easier to create, add, use, and manage a number of accounts using just a single application.
The the best part of this experience is that it is easy to switch between your multiple accounts once you create/add them.
You can achieve this by;
i) Going to your profile and tapping on the profile button at the bottom right of your application.
ii) Click on the options button on the top right
iii) Tap or Click on the gear/settings icon which appears and a drop-down menu of options will appear.
iv) Scroll down to the extreme bottom then choose Add Account option
v) Key in the Password and username of the account you want to add.
vi) You can add up to 5 accounts on one Instagram application.
vii) To switch between accounts, hold the profile button and a menu of all the accounts you added will show up including the active one which is usually ticked beside it.
viii) Touch on any of your accounts to switch and do your activities.
Watch the video below to see how you can easily create and manage different Instagram accounts on just but one app.
Video credits: YouTube
2. Save Favorite or Important Posts and Organize Them Where You Only Can See Them

Photo Credits: Instagram
This feature is one of the very important hacks for Instagram users. With it, you are able to squirrel away those posts you think have been so inspirational and you want to view them time and again.
Additionally, most online marketers and business persons use this hack to monitor their competitors and keep close tabs on them.
If you want to save posts at a place where you are the only one see them, you will have to;
i) Find the post you want to save
ii) On the bottom right of the post is a save icon.
iii) Simply tap it to save the post
iv) You can choose to add it to Your Collection
To view the posts you saved and or added to your collection;
i) Go to your profile
ii) On the top right, click on the options button
iii) You can then click on the setting/gear icon
iv) On the menu that appears, select Saved
v) You will be able to view the posts you liked and the posts in your collection.
3. See Posts Your Friends Recently Commented On or Liked
If you are looking forward to discovering new people to follow and engage with on Instagram, this feature is very important to you. It is easy to see the recent activity of the people you follow.
When your followers like or comment on any posts during their Instagram activities, you will be able to follow up with this feature.
It is another way of seeing posts that are not in your feed. To be able to see the posts your followers recently liked and commented on, you will;
i) Open your Instagram app
ii) Click the heart icon at the bottom of your app
iii) You will be able to see your recent activity log on the YOU tab. Your activity log is where recent events that happened to your profile are recorded. It is there that you will be able to see your recent followers, and people who recently liked and commented on your posts.
iv) To view your follower’s recent activity log, you will either, swipe right or simply touch on the FOLLOWING tab. You will see recent activity of your followers and find people you might follow.
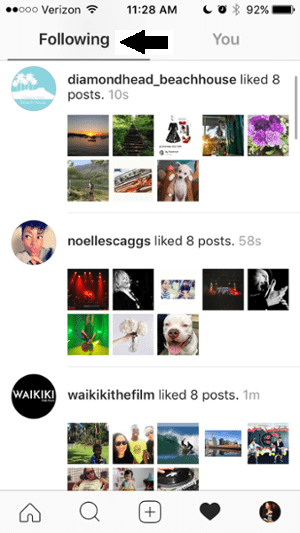
Photo Credits: Cleartalking
4. Pin Your Instagram Posts On Pinterest
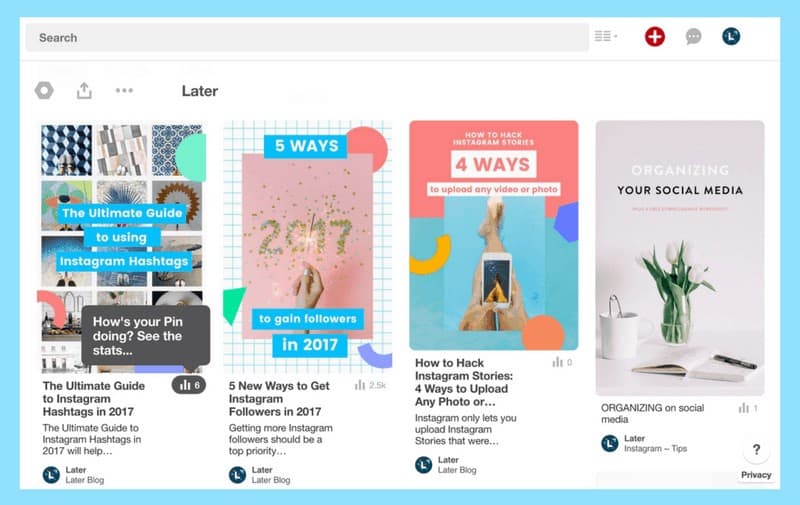
Photo Credits: Later
Unlike other network choices like Facebook and Twitter, there is no option that allows you to directly share your Instagram posts to Pinterest.
However, there is a way to work around and pin your Instagram posts on Pinterest whether on your desktop or mobile device. You will need to have a Pinterest app on the mobile device you are using to achieve that though.
If you are using your Instagram on a mobile device you can:
i) Open the post you want to pin
ii) Tap the 3 vertical dots(⋮) on the extreme right of your post
iii) Select the Copy Link option. This will copy the link that leads to your post onto the clipboard
iv) Open Pinterest on your mobile phone device
v) Add new pin by tapping on the plus icon(+) on the extreme top right of your Pinterest application. An Add a Pin or board menu will show up.
vi) Choose Copied Link
vii) The link of the post you copied will automatically open.
viii) Complete the posting on Pinterest as usual.
If you are using your desktop, it’s even easier. You will
i) Open your Instagram profile on your browser
ii) Find the post you want to Pin to Pinterest
iii) Right-Click on your Instagram post
iv) Choose ‘Open Link in New Window’
v) Using the browser icon on Pinterest, select the pic you want to pin and post.
5. Embed Instagram on Your Website
Instagram enables you to embed your posts to your website to increases your posts’ visibility, the same way you pin your posts to Pinterest. Your website visitors can click on the embedded posts, which direct them to your account. This can also raise your number of Instagram followers.
Let us quickly check out how you can be able to embed your posts on your website for WordPress;
i) Through your browser, open your Instagram profile
ii) Go to the post you would like to embed
iii) On the upper right of the post click on the 3 horizontal dots (…)
iv) Select the Embed option on the drop-down menu that appears
v) Click on Copy Embed Code
vi) On your WordPress create a blog post
vii) Click on the Text option at the bottom right of your screen
viii) This will enable you to edit the HTML
ix) In the text box of the HTML paste the embed code
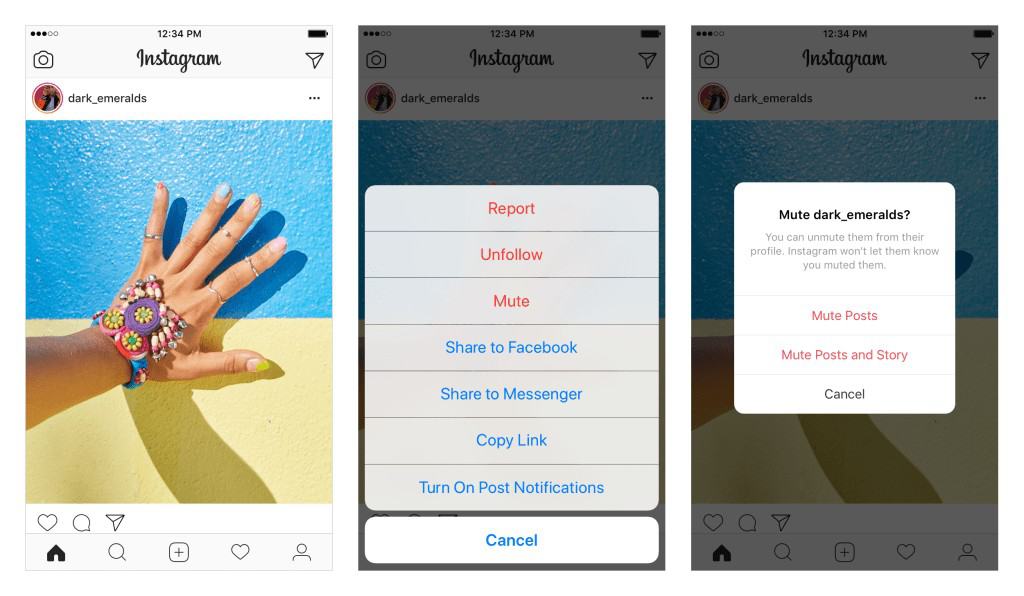
6. Mute Stories & Posts From Specific Accounts You Follow
Maybe there are some accounts you follow and you think their content, or whatever they post is annoying or not good for you.
It is possible to refrain from seeing Instagram Stories and or posts from some accounts you are following on Instagram.
Therefore, instead of having to risk offending them by hitting the unfollow button, you can mute them. But how do you mute annoying account?
Step by step you will have to;
Option A
i) Go to the post of the account you want to ‘stop seeing their posts’ and tap the 3-dotted kind of vertical line(⋮) usually at the top right corner of the post.
ii) A drop down Menu of options will appear
iii) Click/tap on Mute usually the last on the list of the drop-down menu.
iv) From the options provided once you press Mute, you will be able to choose whether you want to mute both stories and posts or posts only.
Option B
i) Press and hold onto the Story of the account you want to mute
ii) You will get options to Mute Story or Mute Story and Posts
7. View All the Posts You Have Liked
With millions of users sharing photos on Instagram, posts including the ones you recently liked are being replaced by new ones on your feed.
Maybe you want to relive the best posts you’ve liked and get a little bit of inspiration. While it seemed impossible initially, you can view the post you’ve liked.
You can do it by;
i) Opening your profile
ii) Click on the Options button usually at the top right corner of your application
iii) You can then click the gear button also called the ‘settings’ button
iv) On the Menu that appears you will see the Posts You’ve Liked option
v) Click on it or tap it to view the post you have liked before.
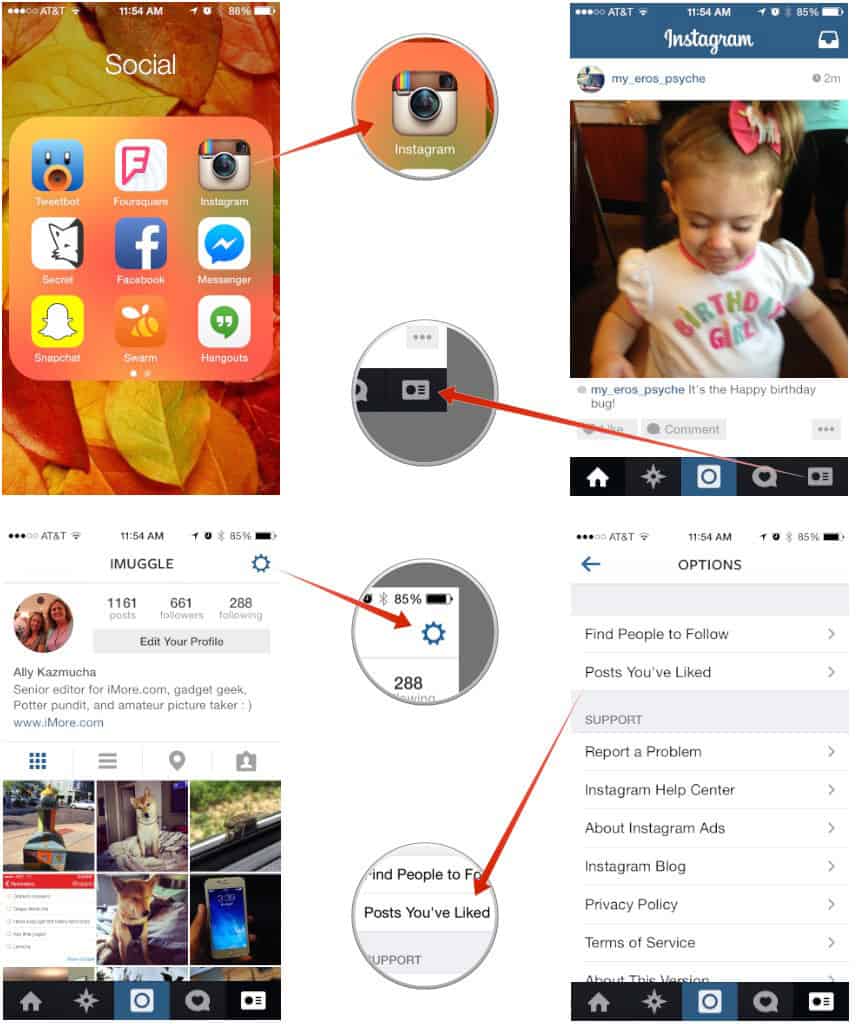
Photo Credits: imore
8. Browse Posts Based on Locations
Isn’t it fun just logging into your Instagram app, search for places and see posts from different world’s geographical areas? For instance, you just search Rio De Janeiro and you see every post geo-tagged on Instagram from Rio in Brazil.
It should be fun, especially putting in mind that you can even search posts of people from the place you currently stay, or you plan to visit.
Maybe you want to visit a certain restaurant you have not been to before, If you search it on Instagram, you will get to see various peoples post at the place and see what to expect when you visit.
There are two ways to this. You can browse through posts on a certain location or through a geo-tag on an existing post.
To use a geo-tag from an existing pic;
ii) Go to the post geo-tagged with the location
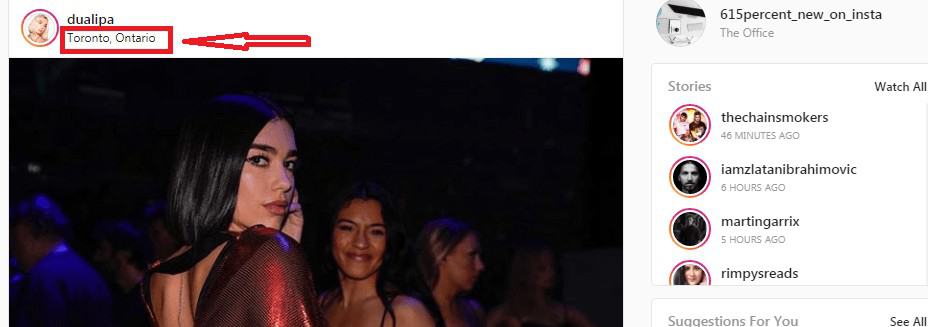
Photo Credits: Instagram
iii) Tap the geo-tag
iv) You will see all posts geo-tagged with the location.
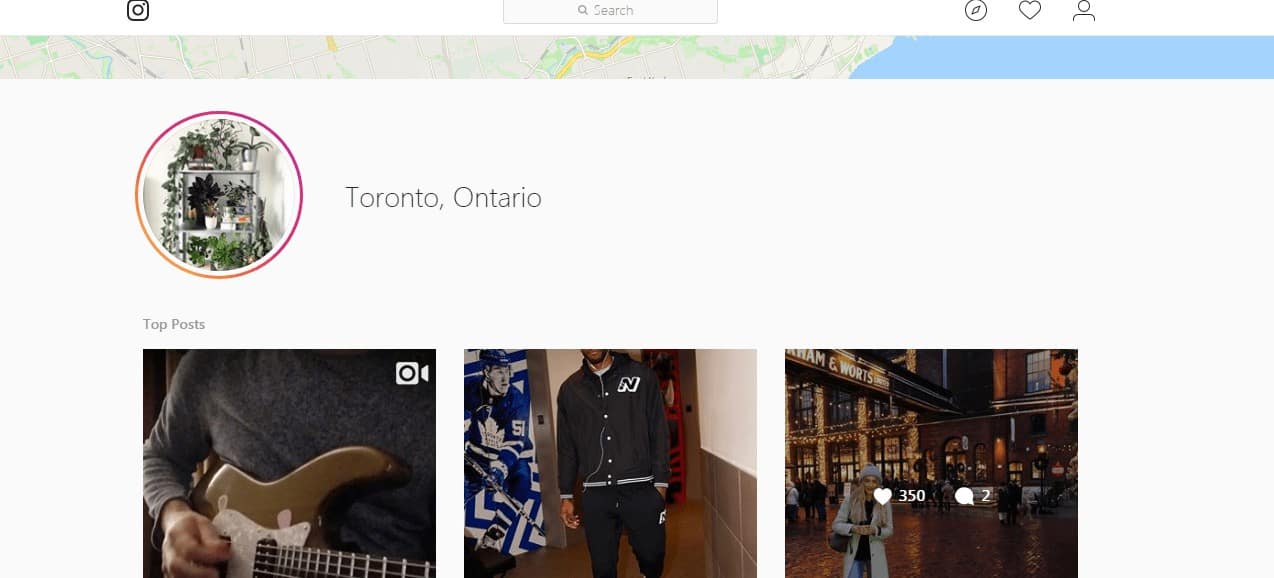
To search for a certain place;
i) Open your Instagram app
ii) Touch the magnifying icon at the bottom of your app
iii) The general search page will open
iv) Tap the search bar and 4 tabs will show up
v) Select Places
vi) Enter the name of the place you want
vii) If you hit the search button, you will view posts geo-tagged with the location.
9. Rearrange the Order in Which Your Filters Appear
If you like using the Instagram filters, there’s probably the most frequent filters you like using to enhance your photos. The hack here is, you can put your most frequently used filters up front on your Instagram app for faster enhancements before you post them.
Here is how you can achieve this;
i) As you post your video or photo, go to filter
ii) Scroll through the filters to the end
iii) You can then tap Manage button
iv) A drop-down menu of a number of filters appear.
v) On the left-hand side of the list, there are 2-line icons next to each and every filter.
vi) Press and hold the 2 line icon and move every filter arranging them in the order of your preference
vii) Check the circles on the right-hand side to unhide the filters you might find useful for your Instagram activities and at the same time uncheck the circles to hide the filters you think will not be useful for you.
viii) Tap Done and Save.
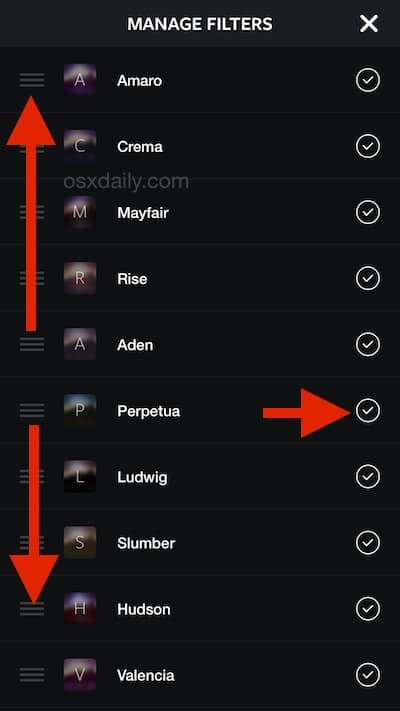
Photo Credits: OSXdaily
10. Remove/Hide/Archive Your Old Posts Without Having to Delete Them
The Instagram archive feature has been of help big time. Maybe you made posts before and right now you feel they are not as perfect as you thought.
Maybe it is an old picture of you, it doesn’t look great, you do not want your friends to see it but you had uploaded it already and you do not want to lose it.
In this situation, the archive feature comes to your rescue. You can ‘archive’ your post by;
i) Finding the post you want to remove
ii) Click on the 3 vertical dots on the top right of your app
iii) Select the Archive option from the menu that appears.
To view your archived posts;
i) Go to your profile
ii) Click on the clock icon at the top right of your app and choose Posts Archive. Your posts that are not visible on your profile are ‘hidden here’. Only you can see them.
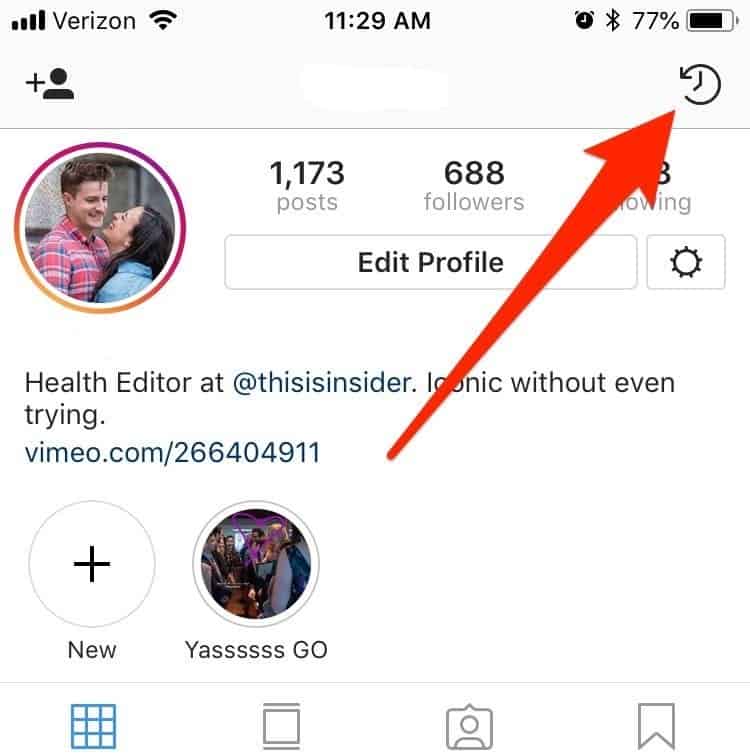
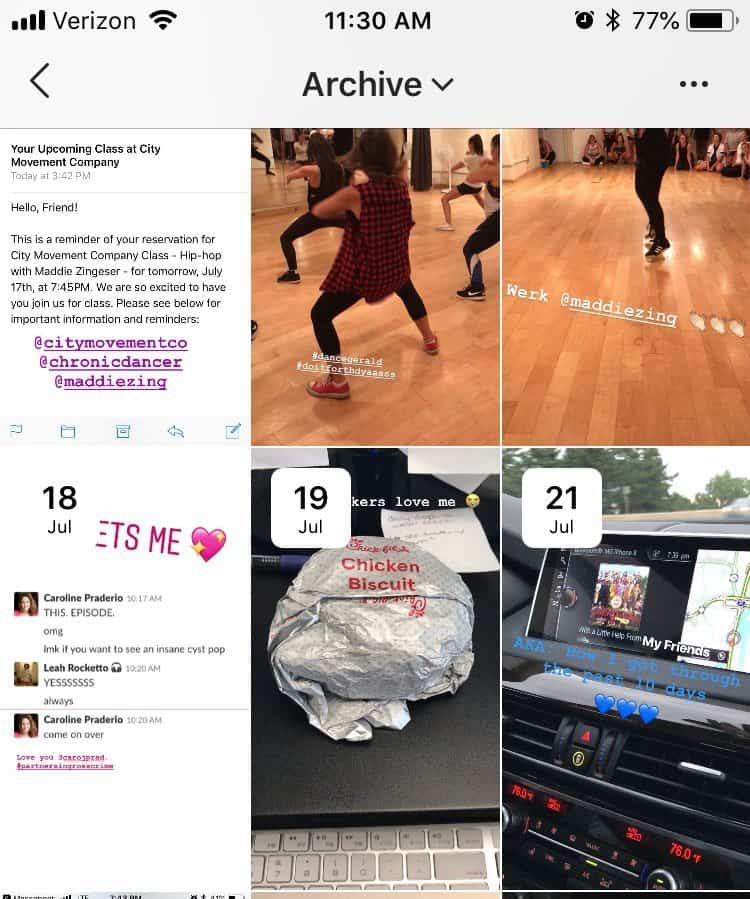
Photo Credits: Thisisinsider
11. Get Notified When Specific People You Follow Make New Posts or Post New Content
Perhaps there is special content from brands or people that you like and never want to miss a single post from them. Do not worry, Instagram has got you covered.
You can get notifications every time your favorite people post by;
i) Visiting their account or profile page
ii) Tap or click on the 3 dots on the top right corner of their profile/account
iii) Choose the Turn on Post notification option

Photo Credits: Techuntold
iv) Suppose you change your mind and do not want to see their notifications anymore, you can use the same procedure and Turn Off Post Notifications.
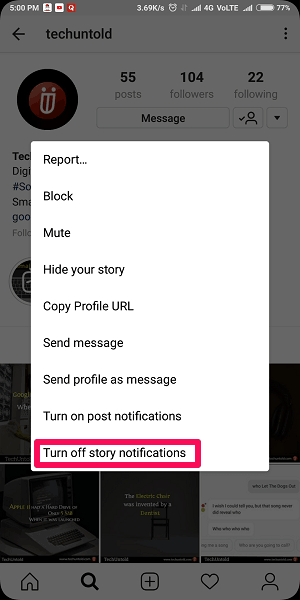
Photo Credits: Techuntold
12. Hide Certain Search Queries
You can choose to permanently delete or remove searches you might have been looking for before from appearing in your search button. It’s like clearing the history of your search button but in this case one query after another.
If you want to achieve that you will have to;
i) Tap the search button on your application – usually looks like a magnifying glass icon.
ii) Once you do that, you will land on your search page
iv) On the top of your screen on the search page, touch on the search box
v) A list of all searches you have ever looked for on Instagram appears
vi) Find the search query you want to remove your history
vii) Tap and hold it until the option to hide appears.
viii) Tap Hide
13. Clear/Delete Your Search History
Sometimes your friends or close people will grab your phone and just open your Instagram account and they want to know who you have been searching.
You can avoid that by following this procedure outlined below
i) Tap or Click your profile image icon( usually on the bottom right of your app)
ii) Then touch the options button() on the top right corner of your app
iii) Tap the setting button/gear button
iv) A list of settings that you want to change will appear
v) Scroll down and click on Search History
vi) Clear your search history
![]()
Photo Credits: idownloadblog
14. Turn Off Comments On a Specific Post
Maybe for some reason, you just do not want to see comments on a certain post. It is easy to turn off the comments. There are two ways to this. You can do it the time you are making your post, or after.
For the first option, while making your post,
i) Choose the video or photo you want to post.
ii) You will get to the point where you need to add hashtags, caption, and locations you can click on the Advanced Settings, usually below all the other options and in a small font.
ii) After clicking on Advanced Settings, you will see the option of Turn off commenting.
iii) You can toggle it on to turn off comments on the post you are currently posting.
Suppose you have already posted your picture or video but you want to turn off the comments section; you can do it by;
i) Go to the post
ii) Tap the 3 vertical dots on the top right
iii) Select Turn Off Commenting option
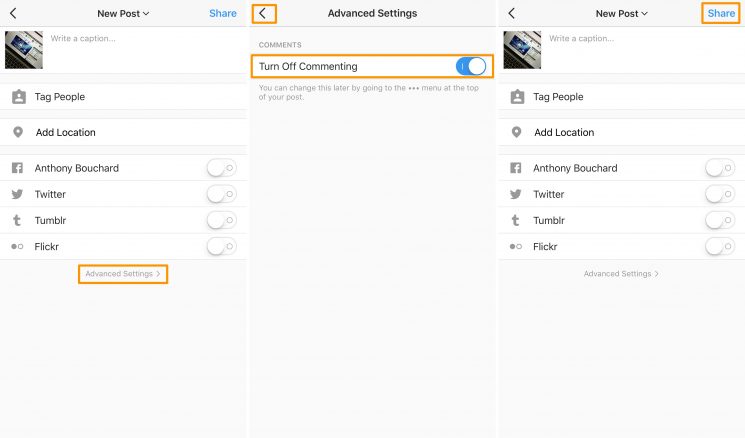
Photo Credits: idownloadblog
Point To Note: It is easy to turn the notifications on and off. The procedure is the same especially if you want to turn on comments on a post you and turned them off.
15. Block and or Filter Comments Based on Keywords
Comment controls feature on Instagram allows you to block and filter comments that contain specific words. Maybe you are tired of social media troll or comments that upset you, it is time to deal with it.
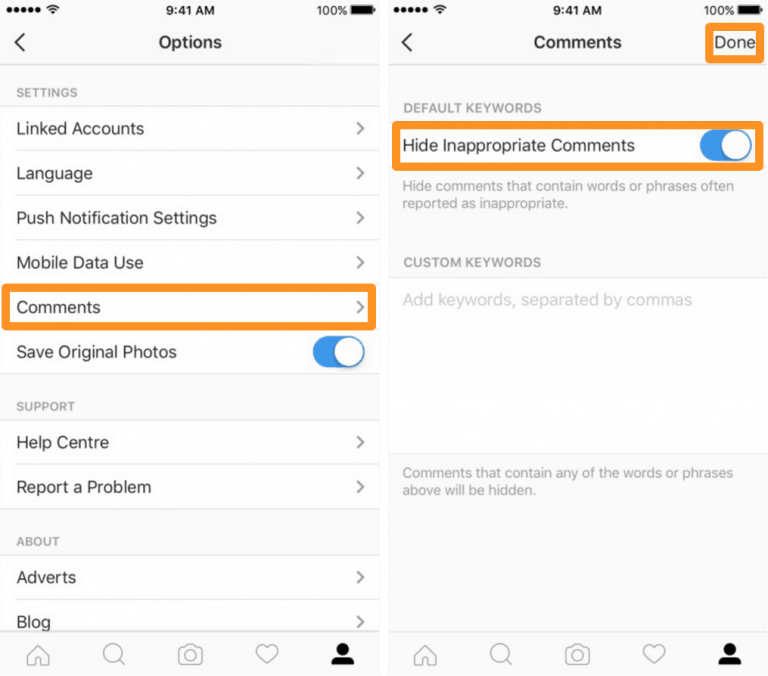
Photo Credits: idownloadblog
But how do you do it?
i) Go to your profile by tapping the profile icon
ii)Tap the options button on the top right corner of your profile
iii) Tap the gear/setting button
iv) On the Menu that appears, click on Comment Controls
v) Turn on the Hide Offensive Comments by touching on the toggle button
vi) By that, any comments that have offensive phrases are automatically filtered and blocked.
vii) You can as well use the manual filter option in which you key in your words you think should not appear in your comment section or are offensive.
The Manual Filter option is found below the ‘Hide Offensive Comments’ option
viii) Once you have keyed in the keywords in the manual filter option, comments that contain the words you keyed in will be filtered and blocked.
16. Delete Comments
This is an easy hack especially by now at least you have received those annoying or unnecessary comments and you have probably sought help to delete them.
Here we will discuss how you can delete your own comments and how you can delete your follower’s/user’s comments on your post.
For your own comment,
i) Go to the post you want to delete the comments
ii) Touch the bubble icon usually below the post you had commented on
iii) Go through the comments to find the comments you want to delete
iv) Touch and hold onto the comment you want to delete until the delete option appears. The delete option appears in form of a trash can icon on the top right of your app.
v) Complete the action by clicking/touching the trash icon to delete the comment.
For your users’ comments the process is quite similar;
i) Touch the bubble button below the post that has the content you want to remove
ii) Go through the comments and find the comment you want to delete
iii) Touch and hold onto the comment and the trash can icon will appear on the top right
iv) Delete the comment by touching on the trash can icon
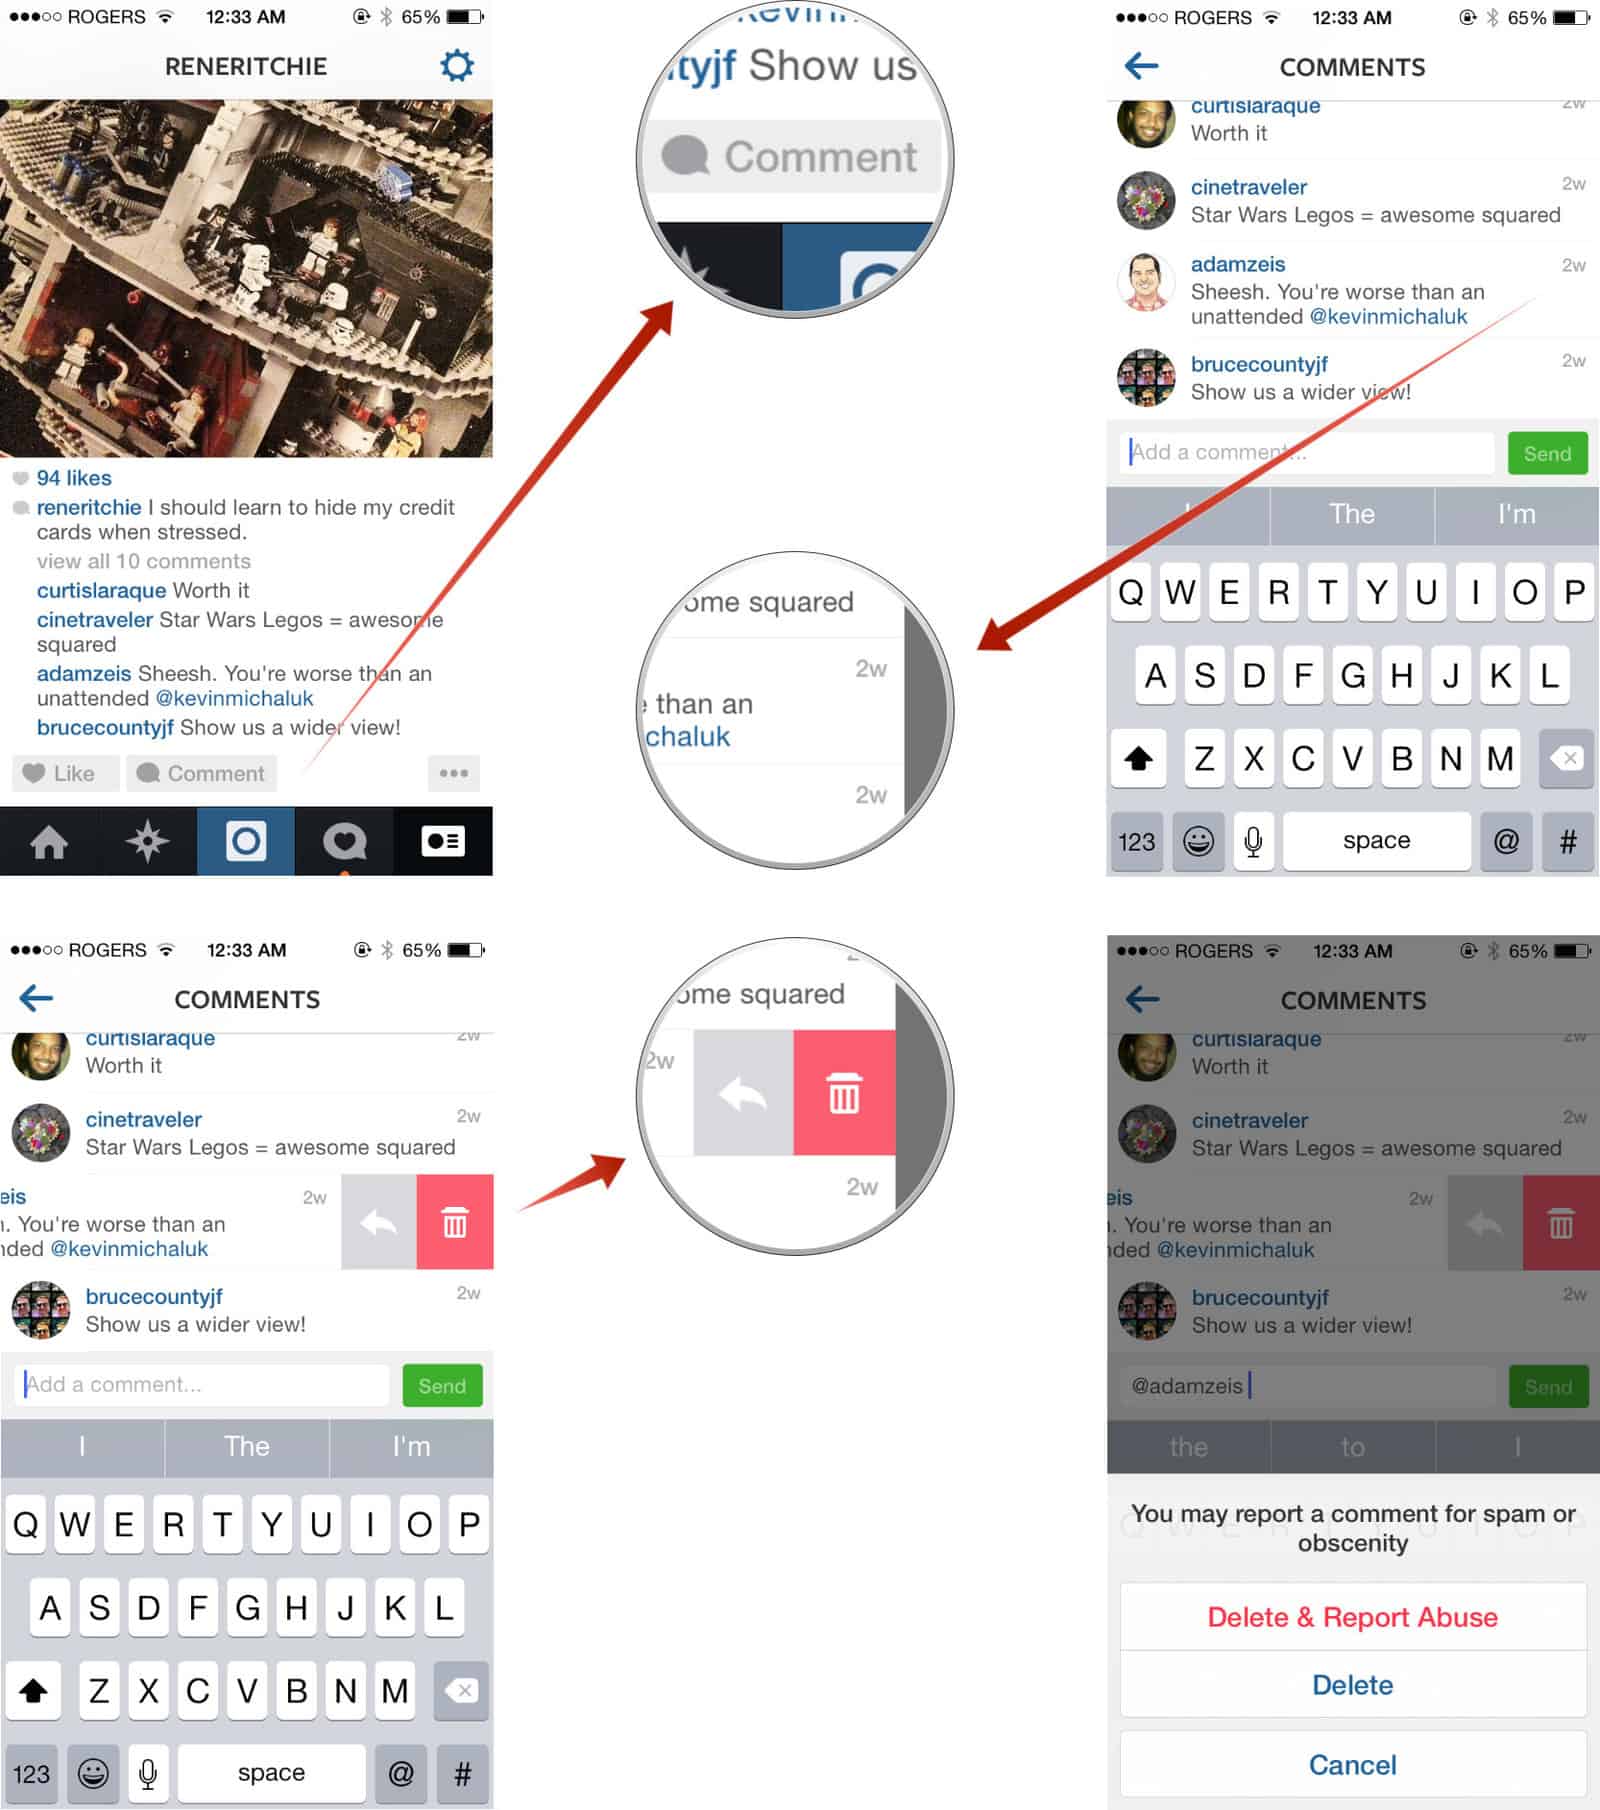
Photo Credits: imore
Point to Note: Sometimes you can delete a comment that you did not want to, or maybe something ringed in your mind and you want to change your mind not to delete a certain comment you had initially wanted to delete.
In this circumstance, do not panic. Instagram gives you an option to undo the action of deleting a comment to regain it.
However, the undo option appears in a red bar at the top of your app. You should be careful not to miss is as it appears in a short time of one to two seconds and then disappears.
17. Zoom In On Posts
Instagram confirmed on their post as shown above that it would be easy to zoom in on your videos and photos using just two fingers.
How do you achieve the zooming?
i) Go to the post you want to zoom in on
ii) Pinch the post using 2 fingers and slowly pull them further apart
iii) You will view and enjoy the details of all posts using that feature. It is as simple as that.
18. Hide Irrelevant Ads
Every time, Instagram displays ads in your feed. Some ads may be relevant and interesting but others might be out of your interest. If you are a regular Instagram user, you will observe a number of ads from apps, brands, startups, and 3rd party websites in your feed. Chances are that you are going to see such posts again and again.
There is a way to try and do away with the ads you might find irrelevant to you. You can do it by;
i) Go the sponsored Ad you want to hide
ii) Click on the 3 dots on the top right
iii) Select Hide This

Photo Credits: Mashable
Point to Note: You will be asked questions why you do not like the ad once you hit the hide this button.
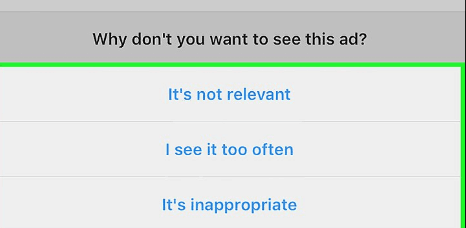
Photo Credits: Instagram
The choice of the answer you will select will be a high determinant if you are going to see the ad again. Suppose in this case you pick it is not relevant, there are chances that you will not see the same Ad again. The answers you pick usually tend to teach the Instagram algorithm on what you do not want to see.
Instagram Profile & Bio Hacks
1. Switch from Personal to Business Account to get Analytics & Run Ads
If you are a brand and you have not yet switched to the business profile, then you are missing a lot of features. To switch the account, you need to;
i) Go to your profile by clicking on the profile icon
ii) Click on the top right corner of your app
iii) Click on the settings icon
iv) Select Switch to Business Profile
v) Choose the Continue option
vi) You will be asked to connect your Instagram account with Facebook. To set up a business account, you must connect your account with Facebook account
vii) After choosing the Facebook account, you wish to connect with you will then provide with your details.
viii) Click Done to make the changes.
Video Credits: YouTube
2. Make Your Bio Remarkable by Use of Line Breaks
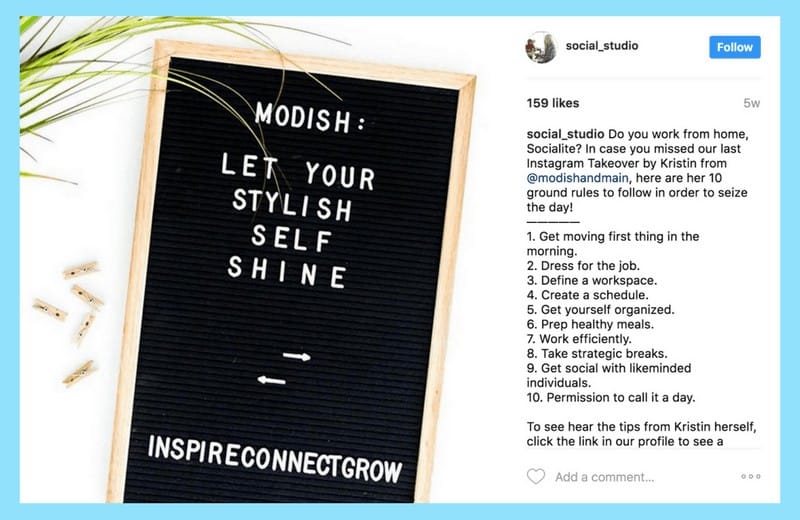
Photo Credits: Later
Line breaks can make the info look magnificent by breaking the text that is in the bio. Adding the breaks can be done by both the mobile phone and the desktop app and are one way you can give your profile visual impression.
For your mobile, you can do it by;
i) Open any notes tool on your device and enter the text describing your bio as you want it to look like.
ii) Select the entire text you entered.
iii) Press and hold on the text until Copy option appears.
iv) Click open your Instagram application.
v) Go to your profile by tapping on the profile icon
vi) Choose Edit Profile option.
vii) Into the bio-field that appears, paste the text you had copied from your notes.
viii) Once you are done, click the tick icon on the top-right corner and save the changes made.
For desktop;
i) Through the web open and access your Instagram profile
ii) Tap Edit Profile
iii) Write and space up the text as you would like it to appear once you update your bio
iv) Tap Submit to make the changes.
Point to Note: The profile viewed on the desktop will appear without the lines irrespective of whether it was edited via desktop or mobile.
3. Add a Link to Your Bio to Draw Traffic
Instagram allows you to use your bio to draw traffic to your other social network or website with a link. It can be done by;
i) Click on your profile icon to check your profile.
ii) Click on Edit Profile
iii) Include the link you want to share on your bio
iv) To make the changes select Done

Photo Credits: ilovefreesoftware
Point to Note: If you are interested in tracking how much traffic your profile link generates, you can add UTM parameters in the link URL.
4. Add a Profile Link or Hashtag to Your Bio
Instagram allows you to link another account a hashtag in your account bio.
This can be done by;
i) Click on the profile icon to visit your profile
ii) Click on Edit Profile
iii) Select Bio
iv) Type @ or # followed by the recommended account username or hashtags respectively that appears.
v) Select the ones you like linked in your bio.
vi) The hashtags or the account you want will then be linked in your bio.
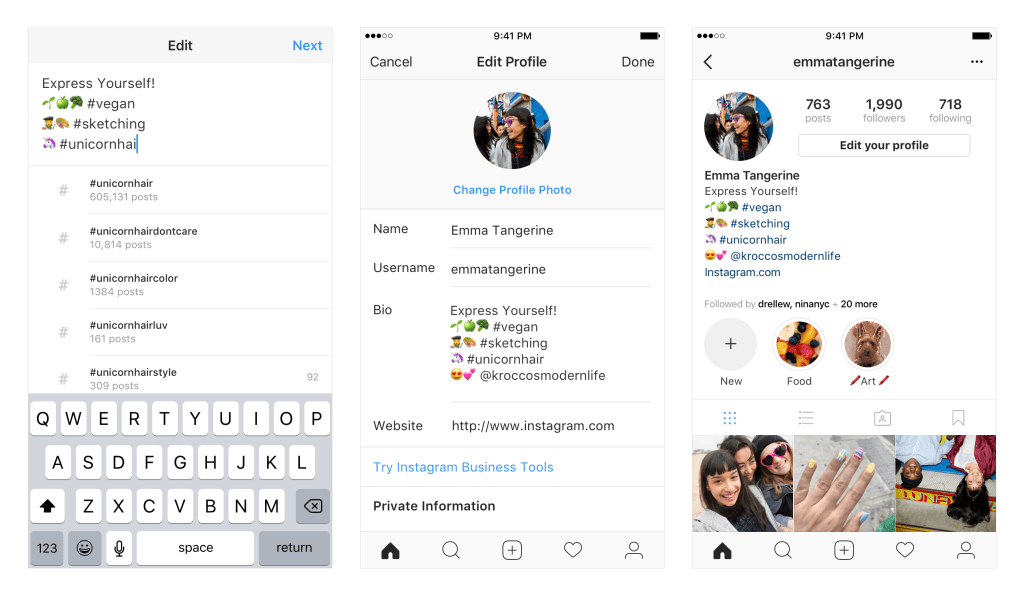
Photo Credits: instagram-press
Point to Note: Suppose you mention other people’s profiles, they usually get notified and they have an option of removing the link. That means that their profile remains in your profile bio but with no link.
5. Hide Tagged Posts
Perhaps some of your followers have tagged you and you do not like the posts they have tagged you in or you do not want to be associated with such kind of posts. Instead of having to untag yourself you can easily hide the posts you have been tagged. How do you do it though?
i) Go to your profile by clicking on the profile icon
ii) Select Photos of You icon usually immediately below your bio
iii) Choose the post you want to hide
iv) On the upper right corner of the post, touch the 3 vertical dots
v) Choose Post Options
vi) Toggle off the Keep in Photos of You option
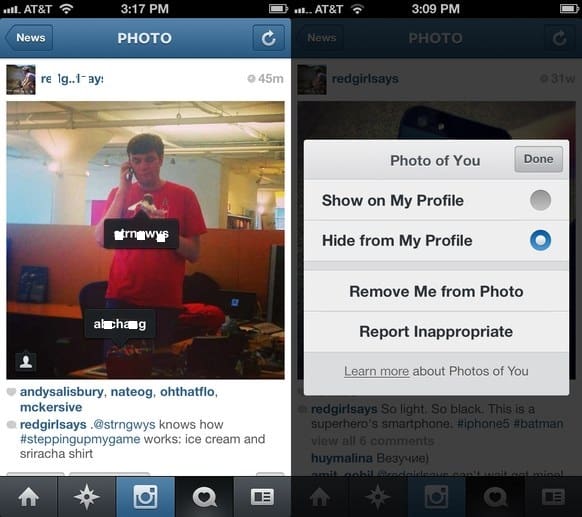
Photo Credits: Wired
Point to Note: While hiding the posts from your profile looks like the better option, you can always choose to opt out being tagged in posts you do not like. Instead of having to toggle off the Keep in Photos of You option, you can simply choose the Remove Tag option to do away with that post.
Instagram Video & Photo Sharing Hacks
1. Schedule Your Instagram Posts
Maybe you are too busy with other activities that you are unable to regularly make posts on Instagram. There are a number of social media tools you can use to schedule your Instagram tools.
From Hootsuite to Buffer to SproutSocial among many others. However, SproutSocial is quite easy to use and you will enjoy scheduling your posts directly to Instagram.
The video below shows how you can use it.
Video Credits: YouTube
2. Create a Custom Location on Instagram
Simply Measured reports that you will get a higher follower engagement rate on Instagram if you include location tags on your posts. That means location tags are very important especially for brands. Your location communicates a big deal to your audience of followers.
While it is might seem hard creating a custom location on Instagram, you can decide to add locations each time you make your posts. That will be a repetitive action though putting in mind that you are a brand posting regularly on your Instagram.
Therefore, a custom location will do you good once you achieve setting it up because you will not need to add location every time albeit having to use Facebook to set it up.
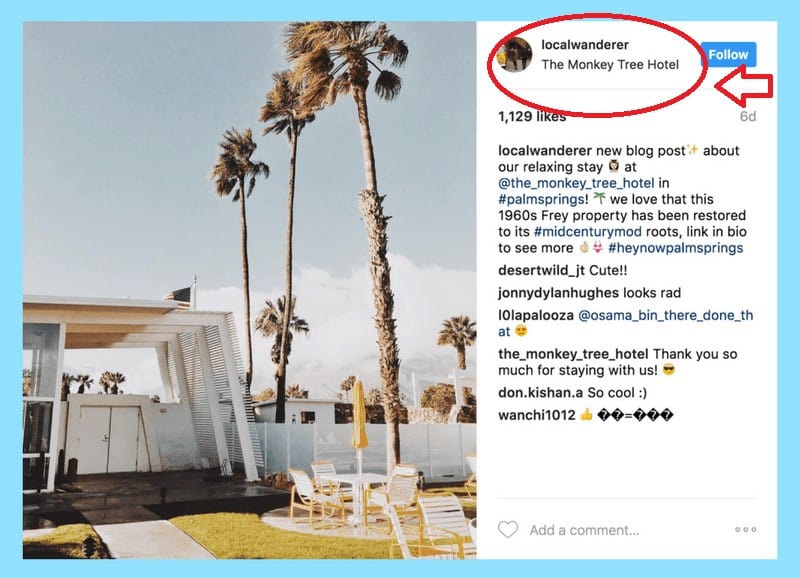
Photo Credits: Later
To create a custom location make sure your Instagram is linked to your Facebook ;
i) Open your Facebook app
ii) On What’s on your mind button click on Check In
iii) Start entering the desired location in the Where Are You text box
iv) Select the location you want customized
v) Click on Add
vi) Choose your City and add your postal code as well
vii) Click Create
Point to Note: For you to use this location on Instagram, You will have to post at least once to your Facebook.
You can now open your Instagram to check if your location is updated. Sometimes it takes up to 24 hours to activate the new location set from Facebook.
To check;
Create a new post on your Instagram app
Click on Add Location
Your location set n Facebook should appear on the options
3. Use Single Photos to Make a Larger One
Ever since its introduction, the split you do it into tiles to create larger photos on your feed feature has really impressed most Instagram users. If you do it right, the feature will leave a mosaic effect that will leave your followers drooling for more.
The good thing is, there are tools you use to automatically create a large photo from tiles of smaller pics. You will not need to worry about having to create them manually. One of the best tools to use is Pic Splitter.
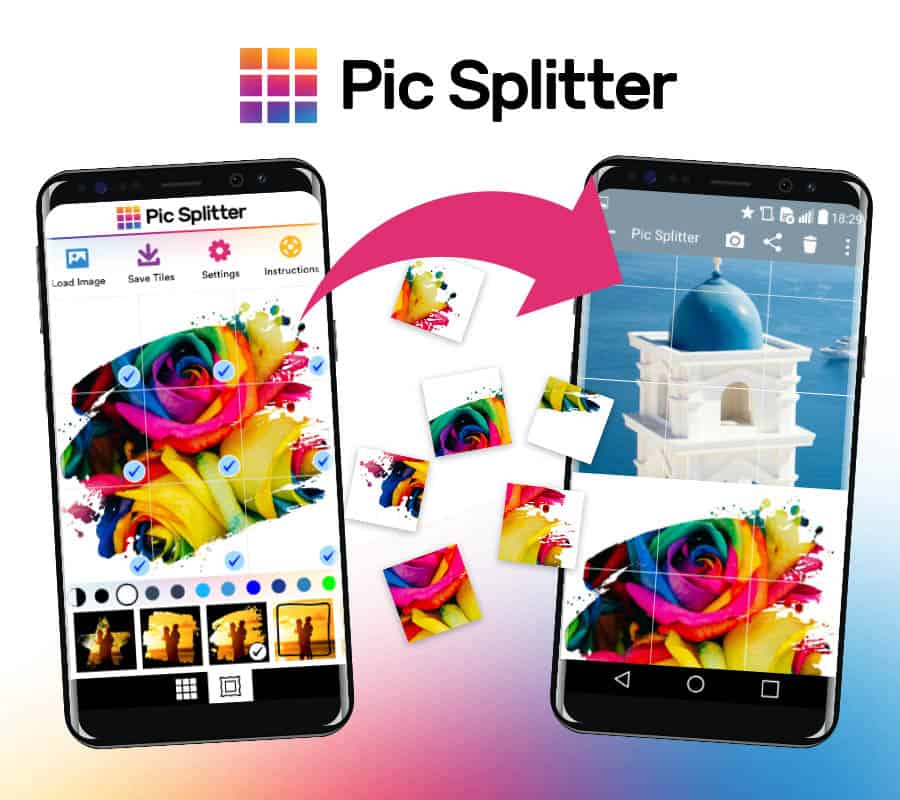
Photo Credits: DesignPieces
Both on Android and on IOS, the feature allows you to divide your Instagram photos into smaller pieces. With the app, all you need to do is;
i) Select your tiles sizes
ii) Select your desired background color that will fill empty spaces
iii) Select the grid layout of your choice
iv) Create up to 9 tiles from just a single photo.
The aftermath will leave you with a grid post that looks like the one below

Photo Credits: Ticketsolve
4. Request to Join Live Videos of Other People
Most brands who use Instagram as their marketing channel utilize this feature especially if they have partnered with other businesses and influencers for takeovers announcement and generally just engagement with their audience of followers.
This feature can as well be used if you are hosting a live Q & A. You will encourage your users to join the live video.
If you want to request joining a live video, you will;
i) Open the live video going on
ii) At the comment section, press Request to join
iii) When the user accepts your request, you get a notification and you will be given a moment to get ready
iv) Once you go live, the screen on your app will split into two
v) You always have a choice to live the live video anytime you want.
For accepting a request from your follower for live video if you are the host of the live video;
i) You will get a notification at the comment section every time there is a request from your users who want to join the live video
ii) Select View and you will have to choose whether to cancel their request to add any of the requestors.
iii) The icon which usually has 2 smileys will record the number of requests you will get through a red number
iv) If press on the icon, you will be able to view current viewers and requests
v) You can invite a viewer you choose to join your live video or accept any of the requests.
vi) You can as well remove the guest and at any time add someone else to your live video.

Photo Credits: TechCrunch
5. Adjust Filters’ Intensity
Filters do enhance your photos or images so they give a good impression to your feed after you post them. However, sometimes you might not want to use too much of it.
You perhaps need your audience or followers to see an original picture or image but you might fancy just a slight enhancement.
Do not worry, Instagram has got you. You can adjust the intensity of your filters. Here is how;
i) As you upload your photo, select the filter you want to use
ii) Touch the filter once more and Edit options will open
iii) Adjust the filters as you would want on the sliding scale that appears
iv) Click on Done to apply your filter to the post
v) Continue editing as you would like it to look like when you post.
6. Blur a Photo’s Background On a Portrait
You have made a nice shot, but your background is not good enough, or you want to keep it a secret, what do you do?
i) Press the add post icon (+)
ii) Scroll to your Camera option
iii) Choose Focus on the options on the record button
iv) Make your shot adjusting your camera as feature allows you to

Photo Credits: TechRadar
Point to Note: This feature is available on selected iPhone series and selected Android phones.
7. Upload a Single Post With Multiple Scenes
You can upload a number of images or videos on a single post. Yes, it’s possible. For photos, these feature gives you an opportunity to share many images or videos in just a single post.
Maybe you just got engaged or you had a birthday party and you want your friends or followers on Instagram to have a look at how it all went down.
If your photographer was able to snap successive shots during the event or took a video, you can be able to share them in just a single post.
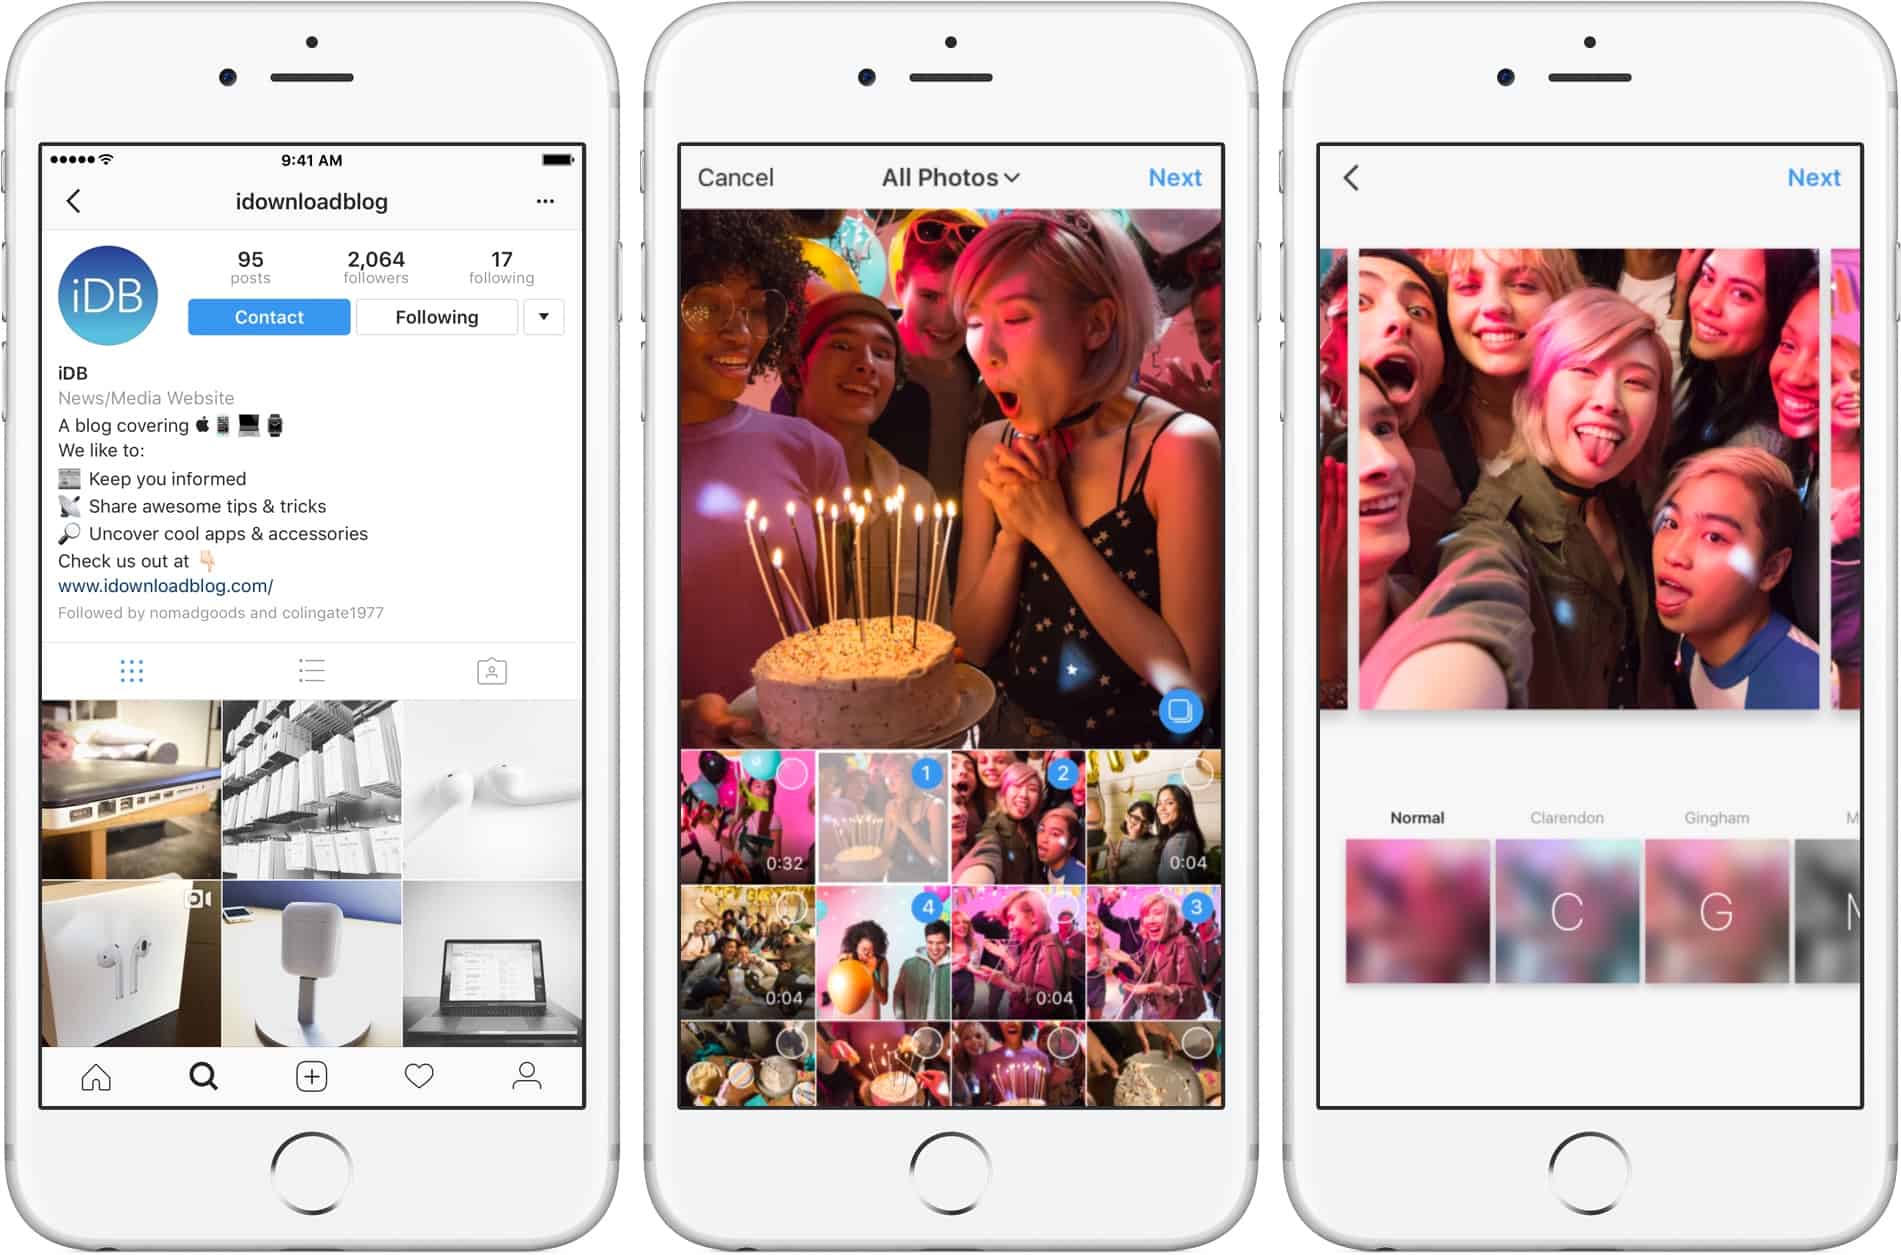
Photo Credits: idownloadblog
How good can that be? The person who will view the post can only scroll to the right as he views how it all went down
How will you achieve that though?
For the images or videos that are already in your gallery or camera roll;
i) On your app, touch the (+) icon, found at the bottom center
ii) On the Library Tab choose to SELECT MULTIPLE
iii) Choose videos and images that you want to include in your post from the camera roll. It is easy, just check the images or videos you want to upload or uncheck the ones you don’t need for the post.
iv) Add filters and captions and location as usual. For filters you can choose different filters as you want your image to appear, however, it is good to be consistent here with just a uniform filter.
v) For videos, you can trim them into a length that favors you.
vi) Complete the process of posting as usual and share the masterpiece.
For videos, suppose you want to post as you record on the real-time, just
i) Press the (+) icon
ii) Press on the Video option
iii) Press and hold on the icon that looks like a circle to start recording
iv) Release your finger from the recording icon to create breaks between your shots, press and hold it again. That will enable you to take multiple shots.
v) After every clip, there is an option to DELETE before you continue.
vi) Make the necessary edits and filters plus adding captions and locations
v) Post as usual
Video Credits: YouTube
Points to Note: This feature is very important. Most online marketers will use this to create a post that clearly defines their products.
Apart from that, the feature enables you to share a number of shots in a single post rather than initially where you would post only one image at a time.
Additionally, the feature lets you share a chronological form of events. Lest we forget that the required length of a video on Instagram is just one minute and this feature enables you to add more videos in just a single post.
8. Share No-voice/Sound Videos
Sometimes you record a nice video but the audio is not good enough, or it does not necessarily fit the viewing experience. It is easy to mute or remove it so that it doesn’t turn out to be a distraction later on.
Here is how you can do it;
i) Press the (+) icon on your app
ii) Select the video you would like play
iii) Select Next
iv) On the top of the screen Touch on the volume control icon to MUTE or remove the sound from the video.
The same process can be applied to Instagram stories. After you are finished recording your video for your story, just simply press the volume control icon to mute it.
9. Save Drafts & Upload Them Later
Perhaps you have taken perfect shots, enhanced them as usual, but you feel like it is not the time to post it.
Instagram allows you to save your work for later with the edits and captions intact. How do you save drafts for later though?
Here’s how you can go about it;
i) Press the add post (+) icon
ii) Edit as usual ( add a location, filters captions)
iii) Click on the back button on your mobile device
iv) Save draft from the pop-up menu that appears

v) If you are now ready to upload your draft, press the add post button(+)
vi) Above your camera roll/gallery, you find a new DRAFTS section
vii) Select the draft you want to upload now
viii) Share it as usual.
Point to Note: If you have so many drafts, you can select the Manage option that appears to manage and find the drafts to upload. The manage option allows you to edit your selected drafts and lets you discard a draft you want to do away with.
10. Save Your Live Video
i) Once your broadcast ends, you can select Save option usually on the upper right corner of your app.
ii) Once saved, you can click Done and your video will be saved in your gallery.
11. Use Line Breaks to Make Your Caption More Readable
If you have ever opened your Instagram and your eyes met quite an amazing site of perfectly formatted captions with line breaks?
No emojis breaking up the spaces, zero periods(.) or hyphens(-_) but just beautiful white space between your texts on the caption? You may wonder how it’s done but it’s quite easy to do.
First, you need to understand that well-spaced captions are an eye catcher and this means that the number of people who read your captions and interact with your posts will skyrocket.
The Appslifehost website can easily turn your normal captions into beautiful captions.
You need to simply;
i) Open their website
ii) Write your captions in the text box provided. For a line break, just press Enter twice and you will get line breaks between your lines. It is that easy.
iii) You can then press Done.
iv) Now open your Instagram app, and in your caption box paste what you copied
v) Share your post as usual.
Direct Messages Hacks for Instagram
1. Edit Your Friend’s Images & Share With Them
Direct messages can be fun these days. When you receive an image message from your friends, you can do some edits and send it back to them.
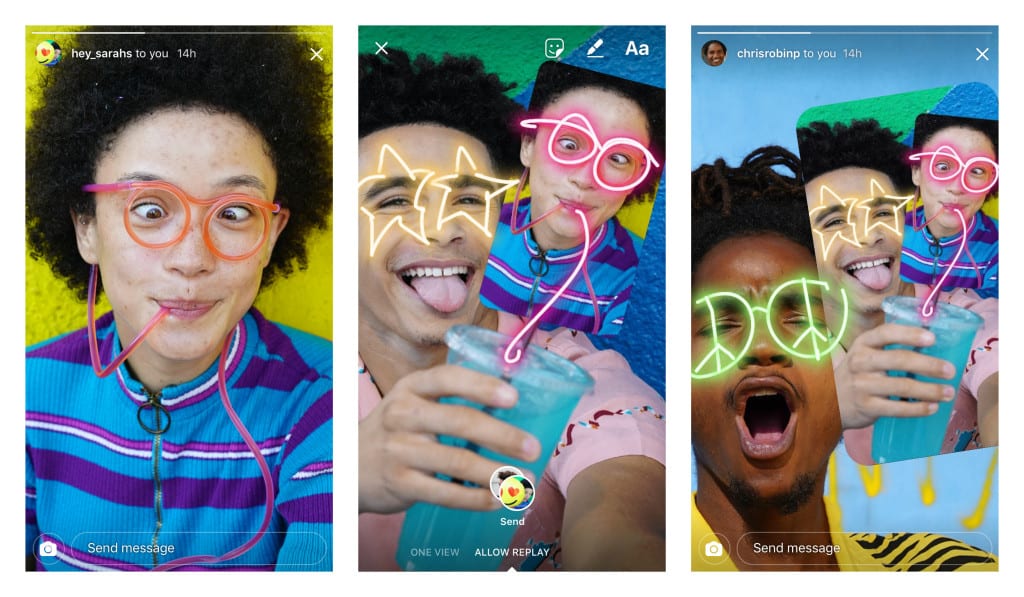
Photo Credits: instagram-Press
You can do it by;
i) View the photo in the Direct Message
ii) Click on the camera icon
iii) You will then Capture an image to reply
iv) A sticker of the message you are replying to will be included as you reply
v) Resize, move and add more text, stickers, drawings to it
vi) Send back
2. Toggle Off Your Direct Message Activity Status
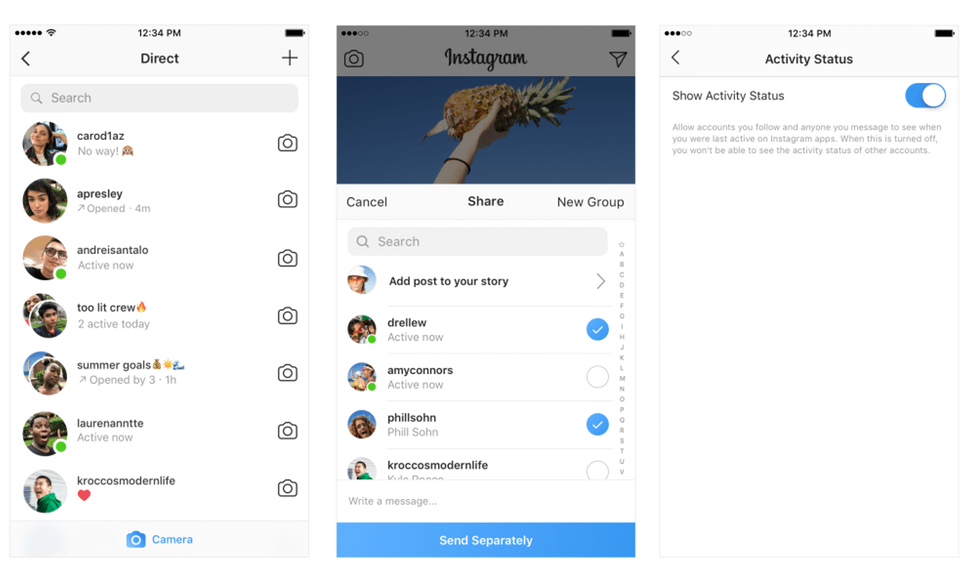
Photo Credits: Bustle
Maybe you do not like it when your audience of followers know about your active session. The Direct Messenger feature allows you to turn off your activity status on Instagram. You can do it by;
i) Go to your profile by clicking the profile icon
ii) Click the settings or gear icon on your app
iii) On the list of options that appear scroll down to Activity Status
iv) Toggle off the Activity Status options.
3. Share Disappearing Content With Your Followers
Through the Direct Messaging feature on Instagram, you will be able to send a well shot boomerang video or photo to a group of followers or friends which disappears after some time. You can do it by the following;
i) Go to your home screen
ii) Touch on the Camera Icon on the upper left side of your app
iii) Create a boomerang, video or just take a photo
iv) Enhance it as you would prefer
v) On the bottom right of the screen, select the Send To icon
vi) Select your preferred recipients
If you want to send it to a group of people select the New Group option and to the group and add members you want to receive your disappearing message
Click on Send
Point to Note: suppose you do not create a group and you select more than one recipients, the message you created will be sent separately to each of the users
4. Share a Live video
If you are watching a certain live video and you want to share it with your audience followers, Instagram allows you to do that through the Direct Message feature. The feature allows you to send even your own video as well.
You can do it by;
i) If it is your own live video, click on the DM icon and share your video to selected followers and or friends through the Direct Message feature
ii) Once you tap on send option, your recipients will receive your video and watch it through the DM.
Point to Note: this can only be successful while you are still live. If you go off, your recipients will not see your video in their DM’s
Instagram Hashtags Hacks
1. Hide Captions
If you want to keep your readers focused on what is crucial, you will have to avoid cluttering your cations. You can avoid that by hiding your captions. There are two ways to hide your hashtags,
The easiest and fastest way to it is;
i) You can decide to put your captions below your post in the comment section and refrain from writing them along with your caption
ii) You should not worry about the hashtags staying at comment section though because one more comment on your post will hide your hashtags safely.
The second way to go about hiding your hashtags from the caption is thorough the Tailwind Instagram Publisher. This is how you can do it;
i) In the Tailwind app, touch the # button
ii) Tap on the + button
iii) Add emojis, symbols or line breaks and characters on every line. For instance, you can use double asterisks and something else like a camera emoji to insert line breaks and move hashtags out of view on the caption respectively.
Point to Note: It may sound involving but it easy once you know how to go about with Tailwind, you will be able to create templates that will be easy to use every time you want to create captions with hidden hashtags. Check out the video below.
Video Credits: YouTube
2. Find the Best Hashtags
A good hashtag will make your content easy to discover and grow the audience. To use an icon you need to;
i) Go to the Explore Tab by touching the magnifying icon
ii) Enter your keyword
iii) Select the Tags column.
iv) From the list that appears, choose a hashtag.
v) You will be able to post an image using the hashtag.
vi) Above the Recent portions appears a small bar with related searches this will enable you to explore more for further research.
3. Save Your Hashtags to Use Them Later
Perhaps you frequently use a specific hashtag then saving the hashtag will help you in saving your time and energy. How to save the hashtag;
i) Use the notes app to create a new note.
ii) Add your preferred captions to the notes
iii) When you want to make a new post then copying the text from the notes app then posting it into your caption.
4. Follow Your Hashtags
To follow your favorite content for inspiration you have to;
i) Go to the Explore Tab by touching magnifying icon
ii) Key in the hashtag of your choice
iii) Select Follow option on the page that appears
The Hacks For Instagram Stories
The Instagram Story feature, ever since its launch back in August 2016, has spread like wildfire. As we talk, there are over 300m daily users of the feature and that actually shows how popular it has grown.
There is a lot you can do with your Instagram Story feature, where you are using personal or business account. One by one, let’s start laying down the hacks you can implement if you want to fully utilize your Instagram Stories.
1. Post Multiple Videos or Photos at Once to a Single Story
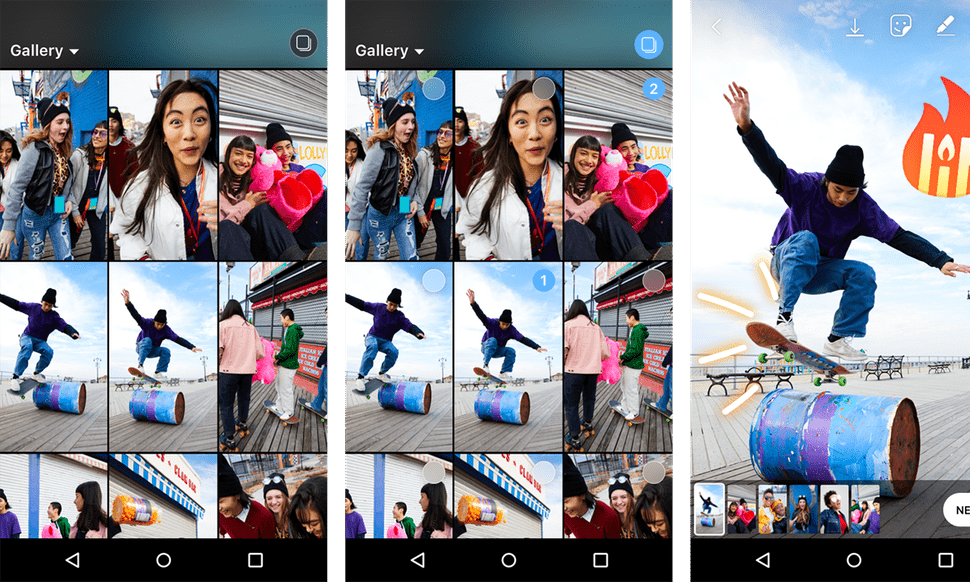
Photo Credits: Bustle
Just like doing the multiple images and videos on a single post we discussed above, Instagram allows you to post multiple photos and videos on one Story.
Perhaps you were at an event and you just want your friends/followers or audience to see every bit of how the activity went down without having to worry about posting so many Stories. It is very possible.
Here is how you can do it;
i) While at the home screen, swipe right to your Camera of Instagram Stories
ii) Choose the option of uploading media from Gallery on the bottom left of your app
iii) Click on SELECT MULTIPLE option on the upper right part of your app
iv) Add up to 10 videos or photos from your gallery or camera roll and tap Next
v) Edit your Stories usual, adding texts and stickers to each of your videos or photos
vi) Once you are satisfied with the edits tap on Next
vii) Select the Share option found beside Your Story option on the menu that appears
Point to Note: You can undo the move suppose you change your mind. The undo option appears in a blue bar below the screen second after hitting the Share button. The undo option also disappears in a few seconds, so make sure you make up your mind to undo your action quite quickly.
2. Pin Your Favorite Stories to Your Profile
Instagram has made it possible to keep your favorite stories on the profile for your preferred period. This feature is for business accounts though and brands have really utilized it in their Instagram marketing strategies. You can pin your favorite story to your profile through the following steps;
i) On your business profile, at the top left Touch the NEW circle icon
ii) Pick your preferred story from your archive (Once the stories on business accounts expire, they are usually saved in the archives)
iii) Tap Next
iv) Give a name to your tittle
v) The highlight will then appear on your profile and stays as the single story and your followers may click when they visit your profile.
vi) To make changes on the highlight click and then hold it on the profile. If you do not remove it, the highlight will stay on your profile as long as you want.
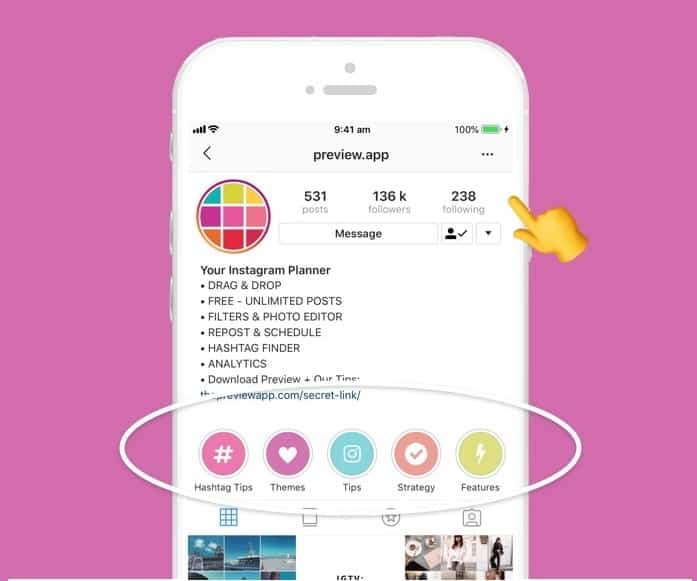
Photo Credits: Thepreviewapp
Point to Note: You can fancy having as many Highlights as you want. Furthermore, not until you remove them, Highlights will remain on your profile for all the time.
3. Record a Hands-free Video
The Hands-free video is amazing. You will be able to record an 11-second video without having to worry about pressing and holding onto the record icon.
This feature, as from studies has in one way or another made Instagram more popular compared to Snapchat.
If you want to achieve a Hands-free video you will;
i) Open the Stories Camera by swiping right while at your home screen on your app
ii) At the extreme bottom of the screen that appears, swipe to the left until HANDS-FREE appears.
iii) Press the record button
iv) You can either let it record to the end or you can easily touch the recording button to stop recording.
Video Credits: YouTube
4. Add Texts to Your Stories
This feature enables you to include multiple texts to your posts on the story. Online marketers are making maximum use of it because it enables them to define their products through stories.
To add text to your stories;
i) While at the home screen swipe right to your Camera of Instagram Stories
ii) Record a video or snap a photo
iii) Touch on the screen of the snap takes to add text.
iv) Alternatively, on the top right there’s an add text icon you can tap and add text to your story.
v) Type your text
vi) Tap on Done
vii) Share Your Story
5. Change/Enhance the Color Of Single Words or Letters in the Text
i) While at the home screen swipe right to your Camera of Instagram Stories
ii) Record a video or snap a photo
iii) Touch on the screen of the snap takes to add text.
iv) Alternatively, on the top right there’s an add text icon you can tap and add text to your story.
v) Type your text
vi) To select or highlight any text written, Touch and hold onto the word you want to highlight
vii) Select the desired color you want your text to be like
viii) Edit as usual and then post it on your story.
6. Add Stickers to Your story
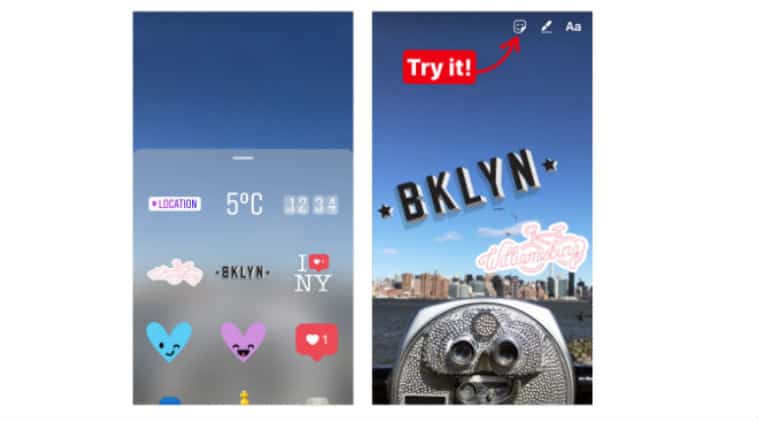
Photo Credits: IndianaExpress
Just like text, Instagram enables you to add as many stickers as you like to your story. Stickers have different functions and it depends on how and why users want to use them.
To add stickers to your post;
i) While at the home screen, swipe right to your Camera of Instagram Stories
ii) Record a video or snap a photo you want to add to your story
iii) On the top right of your screen touch the smiley sticker
iv) Select a sticker of your choice
v) Once you select, you can press on your sticker again to get more options available. For instance, for temperature sticker, you can select either Fahrenheit or Celsius
vi) place and then resize your sticker as you would want it to appear
vii) Repeat as much as you like(from step iii)
7. Sharing Your Instagram Stories to Your Stories on Facebook
Instagram allows you to share your Stories to your Facebook Stories. This can be a single post or all your Instagram stories.

Photo Credits: ShoutMeLoud
You can do it by;
i) Create your Story and click Next
ii) Choose Your Facebook Story option.
iii) Select Share.
iv) Your story will be available in the Facebook story.
To automatically set up Facebook story sharing you will;
i) Visit your profile and at the top right corner, click the gear/settings
ii) Select Story Settings
iii) Choose Share Your Story to Facebook option by toggling it on.
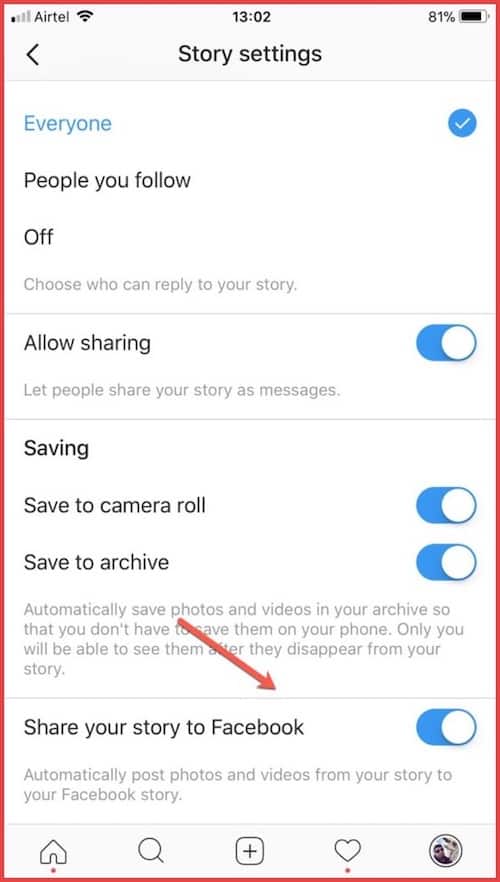
Photo Credits: ShoutMeLoud
8. Share People’s Post On Your Stories
This is Instagram’s story version of what is known as a regram. It is an amazing feature to give shout outs to relevant influencers or bands or share user-generated content.
How do you share people’s post on your Instagram story?
i) Tap on the icon that looks like a kite() at the bottom right of what would like to share
ii) Select Add Post to your Story
iii) Like a sticker with a customized background, the post shows up with a number of options.
iv) You can move it, scale, rotate and even touch it to view more editing styles.
v) Once you are contented with its appearance, touch YOUR STORY icon at the bottom of the screen and successfully make it your story.
vi) Once posted, the post usually show the username of the original poster and suppose your followers tap to view your story, they will see the original post as well as more content like the captions, locations, and hashtags.
Point to Note: You will only be able to share posts to your stories from public accounts. You always have an option to opt out in the settings if you do not want your posts shared on other people’s story.
9. From Spotify, Share an Album or a Song on Your Instagram Stories
You can show people how stylish your brand is through this feature. You are supposed to have a Spotify application on your device to achieve this though.
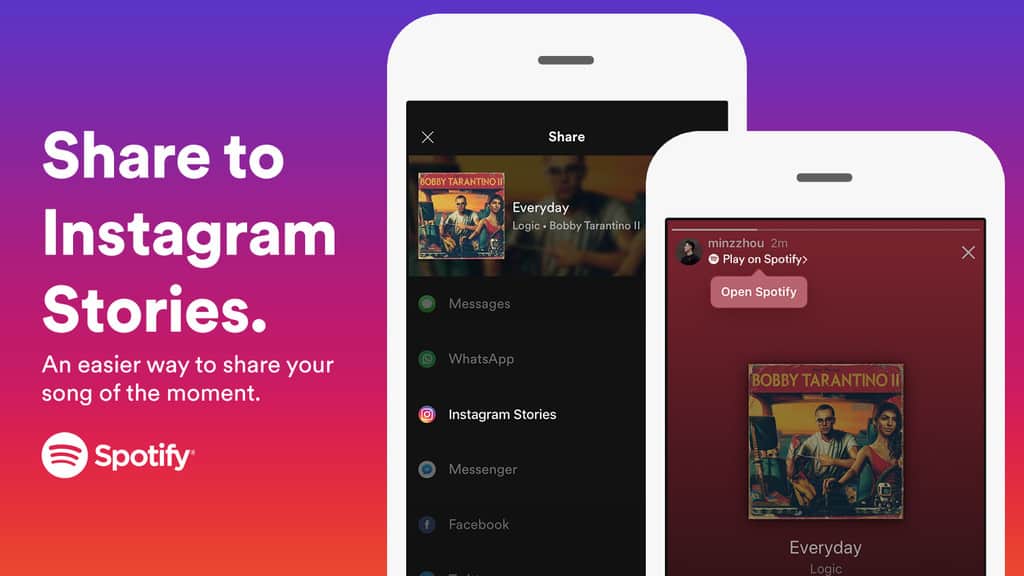
Photo Credits: ArtistsSpotify
In order to share an album or song through Spotify, therefore;
i) Open your Spotify application on your mobile phone device
ii) Search for the album or song you would like to share
iii) Open the options Menu by clicking on the 3 dots
iv) Scroll down the options
v) Click Share
vi) Touch Instagram Stories
vii) Your Instagram app will automatically open. You can then add text, or sticker to the album or song you want to share on your stories.
viii) Finish by Clicking Your Story
Point To Note: When you share a certain song, your Story will show the name of the album of the song. That also suggests that sharing a song will look more ‘classy’ than sharing an album even when both are allowed.
10. Add Text Only To Your Story Post

Photo Credits: DailyMail
An image usually speaks a thousand words, however, sometimes a single word speaks volume and you just want to add purely text to your post. You can add pure text top your Story by;
i) While at the home screen, swipe right to open the Story Camera
ii) Choose the Type option
iii) Touch on the screen that appears and then enter your message
iv) Edit your text by trying out various styles
v) Select your favorite colors of the text and backgrounds
vi) Touch Next when you are satisfied with your enhancements
vii) Share your text only Story
11. Mention Other People’s Accounts In Your Story
For a number of online brands, showcasing an influencer or giving a shout-out to other businesses in any takeover is one of the best ways to appreciate them.
Here is how you can mention other peoples brands in your story;
i) While at the home screen, swipe right to your Camera of Instagram Stories
ii) Record video or snap a photo
iii) Tap the add text icon (Aa)on the top right corner
iv) Using your keypad, start keying in the username of the individual users you want to mention. Before the username, type or put the @ symbol.
v) A suggestion of usernames similar to the account will appear
vi) Choose the right account from the suggestions
vii) Select Done
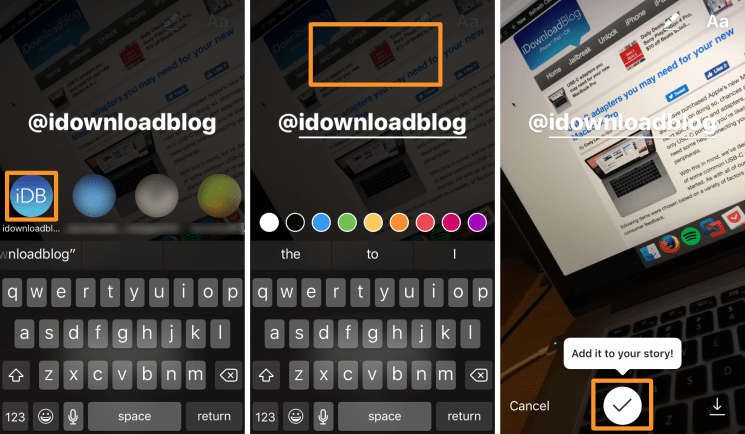
Photo Credits: Idownloadblog
Point to Note: Once you mention people, they will automatically get a notified that they have been tagged. They also get a Direct Message which contains a preview of what you posted on your story.
12. Share Your Stories to Your Profile
You have viewed the performance of your story and maybe it has done quite well. Putting in mind that Stories only last 24 hours before they disappear, you might want to share your hot Story to your profile.
How do you share your Story to your profile?
i) Click open the story you want to share
ii) On the bottom right corner touch on the 3 dots icon
iii) Click Share as Post
iv) Add captions, pass through filters, and edit as you would do to a normal post
v) Post as usual.
13. Hide Your Story From Some Users
Perhaps you want to keep your Instagram Story a secret and you do not want specific people to see it.
Here’s is how you can do it;
i) Go to your profile by touching on the profile icon
ii) Touch the options button on the upper right corner of your screen
iii) Click on the Settings/gear button
iv) Find and select Story Settings
v) Choose Hide My Story From Option
vi) Add usernames of the individual accounts that you do not want them to see your Story.
vii) Click on Done

Photo Credits: Theappfactor
14. Zoom Your Videos on Instagram Stories
With just but a single finger, you can easily zoom in and out on your videos.
You can do it by;
i) While at the home screen, swipe right to your Camera of Instagram Stories
ii) Start recording your video by pressing and holding the capture button
iii) Zoom in and or out by sliding up and or down with just one finger.
15. Use Instagram Music Library to add a soundtrack to your Story
Instagram has set aside thousands of different songs that you can choose from in case you fancy adding a soundtrack to your stories. This is how you can do it;
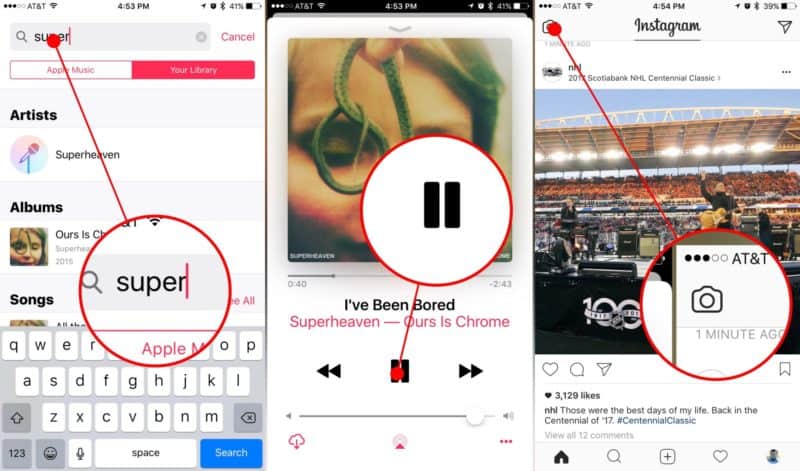
Photo Credits: Theappfactor
i) While at the home screen swipe right to your Camera of Instagram Stories
ii) Take a video or photo you want to add to your story
iii) Touch the Smiley Face icon(Stickers icon) usually at the top
iv) Multiple options appear including the Music sticker option
v) Click on the music sticker and you will be redirected to a music library from Instagram
vi) Select a song of your choice by browsing through what’s trending, mood and genre
vii) To review your track before posting, you can opt to Play it.
viii) Rewind or fast-forward your song if you want it to start at a certain desired point
ix) Tap Your Story option to add the post to your Instagram story.
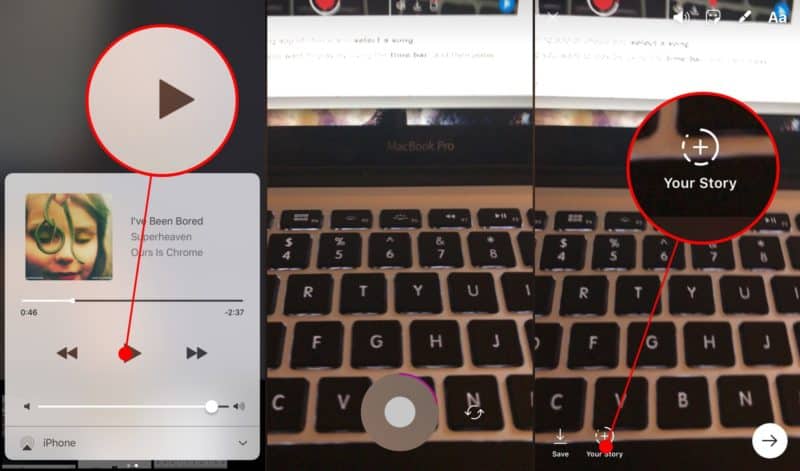
Photo Credits: Theappfactor
16. Watch, Pause, Go Back or Skip Other People’s Stories
Other people’s stories will appear on your Instagram feed in a chronological order on the top of your screen. That means if you want to watch all of them, you will have to start watching from the most recent on the left to the old ones on the right.
Sometimes, the stories are too many of them that you would not fancy watching all of them. You will have to choose what to watch, skip what you do not want to watch and go back to watch a Story you think is worth a re-watch.
How do you achieve all that though?
i) Tap on any Story regardless of the arrangement to start watching.
ii) To pause on a certain story, just press and hold onto it while watching or viewing.
iii) To go back to the previous Story, Swipe left on the current Story you are viewing or watching.
iv) To skip the current Story you are viewing or watching, swipe right on your screen.
Point to Note: You can do it on both photos and videos.
17. Share Videos and Photos of Any Size Thumbnails on Your Stories
Instagram can allow any size of the thumbnail whether a photo or video. You can post that large size company photo on your story without having to worry about cropping it out.
You can do that by;
i) While at the home screen, swipe right to open the Instagram Story Camera
i) From your gallery/camera roll upload your large size thumbnail photo
iii) Zoom out or in to choose a perfect size for your story
iv) Share on your Story
18. Replay Your Live Video & Share Them On Your Instagram Stories
Sharing of the live videos can be done by just clicking the Share button on the screen after finishing the broadcasting, and the video will be shared as the Instagram stories.
Point to Note: The video recording option usually stays for 24 hours. While playing, it will show all the likes and the comments of the video from the initial broadcast. With that, the feature allows you to view how many people have watched your video.
19. Save Your Instagram Stories to Your Gallery or Camera Roll
Maybe you want to publish your Instagram story on another network? It is easy. There are two ways to this. You can save your story to your gallery or camera roll before and after posting your story.
For an instance where you want to save your stories before posting them;
i) While at the home screen, swipe right to your Camera of Instagram Stories
ii) Tap the settings/gear icon on the top left of the screen
iii) Toggle on the Save to Archive option
iii) Take your video or photo
iv) Proceed to post your story as usual.
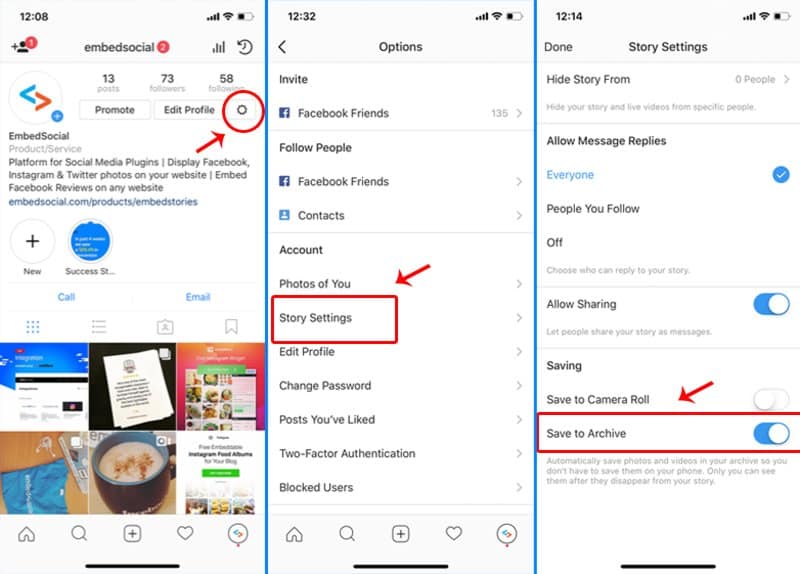
Photo Credits: EmbedSocial
Point to Note: Once the option to save to your Gallery is toggled on, every time you post your story, it will be saved in your gallery or camera roll.
For an instance where you want to save your already posted story;
i) Touch open the story you want to save to your gallery/camera roll
ii) On the screen of your story, swipe up
iii) Touch on the icon on the upper right corner
iv) Save your Story
20. Follow Up on Your Story’s Performance
Your Story’s performance is very important especially if your account is for marketing. At the end of the day, you want to know how many people have viewed your Story.
It is very possible with Instagram and we have to accept Instagram did a good job in this sector. This feature makes users curious and at the same time, users are able to track the number of people who viewed your status.
Without it, Stories would have been boring let’s be honest. To see who watched or viewed your status;
i) Click on the Story you want to check
ii) Swipe up on the Story
iii) You will be able to see the number of views on your story plus the usernames of accounts that watched or viewed your video or photo in the Story.
Wrapping It UP
There you go! 50+ tools, tricks, and features just for you! They are all the ultimate hacks you need for your Instagram. As a user of social media marketer, you are going to take your Instagram activities to a completely new level. If you master them, you are definitely going to use Instagram like a pro.