Having signed in your new Pinterest account, there are quite a lot of things you ought to know. This will see you through as you start and develop your online venture. That said, what’s contained in the guide is your recipe to get started and GROW on Pinterest with a whole lot of Pinterest growth tips and tricks along the way.
There are two main objectives when beginning to kick butt on Pinterest.
- Optimizing your site to be ‘pinnable’, and
- Getting your Pinterest Boards moving and ready for YOUR pins.
What’s Really Awesome About Pinterest?
As you get along, you will realize that Pinterest is really an awesome platform. You don’t even have to be a Pinterest user to get traffic from Pinterest. However, you need to have Pinterestworthy images on your blogs posts to get traffic from Pinterest. All you need to do is embed your relevant Pinterest board at the bottom of your blog posts.
What Is a RoundUp Post?
Simply put, a ‘RoundUp Post’ is a post that contains your favourite pins (ideas) on that topic. This allows you to “borrow” the images OTHERS make for their pins.
Ex. http://involvery.com/masoncupcakeseasy/
RoundUp posts absolutely DO give proper linking credit to those pinners, so make SURE you do that. But by “borrowing” and crediting these other pinners, we get the benefit of having those images on OUR web page that others can use to PIN our web page.
Also, note that the only pins on your Blog Category Boards will ALSO be pinned ONLY to your site.
How To Pin These RoundUp Posts
Roundup posts are overly essential. But, how do you manage them? Each week,re-pin that pin on your Blog Board to another relevant board. So, if you only have access to FOUR other boards (with a total of 5 boards: your main Blog Board, a Blog Category Board, and 3 other ‘related’ boards), you would re-pin to each of those other boards each week.
Example: You publish a RoundUp Post on your site titled: 7 New Baby Gift Basket Ideas I Love
That RoundUp Post consists of other people’s Pinterest pin images of baby gift baskets you really DO love , and you give credit links properly. This concept is genuine “curated content” you are “curating” things you genuinely love and giving credit where credit is due.
Once your baby gift baskets example post is published and you CHECK everything to make sure it works, you would pin it to your main Blog Board. Then you start your Cross Pinning Strategy.
Basic Cross Pinning Strategy

Still on the last example, the next week, you’d re-pin that pin to your “Baby Shower Gift Ideas” board (an example board name just to give you an idea of how this works). Then, the next week, you’d re-pin that original pin to your Blog Category “Parenting Ideas” board.
Then, the next week, you’d re-pin that original pin to your “DIY Crafts To Make or Sell” board. Then, that last week, you’d re-pin that original pin to your “Basket Craft and Storage Ideas” board.
Each board has it’s own target audience, so what you’re doing is showing your pin to a new target audience every week. Think of it like passing out flyers. This week you go to one neighbourhood, the next week a new neighbourhood, etc.
Cross Pinning is somewhat like that. You wait a week between pins, so you always have a pin to that RoundUp post that is new. How you cross pin doesn’t really matter in the long run what matters is that you DO cross pin.
Remember never pin something just once! When you’re new to this whole concept, start with a week. It’s easy to plan and to remember and much easier to learn the concept without confusing the heck out of yourself.
Once you’ve cycled through all the boards, you can pin that RoundUp post to, you can start over if you want to. Remember, you’ll be gaining new followers every day. By the time a month has passed, and you’ve completed your first cross pinning schedule, you’ll have NEW followers who probably have not seen that pin before.
Just remember to keep your boards constantly moving with new pins and repins at least 8 of every 10 being pins and repins to sites that are NOT yours.
Advanced Cross Pinning Strategy
Like other online platforms, there are basics and advanced tips. Having understood the basic cross pinning strategy, below is an outline of an advanced cross pinning strategy.
Still on our example with the initial RoundUp post, the title was: 7 New Baby Gift Basket Ideas I Love. That means your Round-Up post has SEVEN Pinterestworthy pins in the content of your post. Each of those 7 images can be set up in a faster paced cross pinning strategy.
Make sure ALL your boards (with the exception of your main Blog Board) are constantly moving with new pins. Either do it manually or be smart and use the auto-pinning tools. Each pinnable image can be posted to each of your related boards every DAY.
Each is a different image, so your followers of each board get to SEE something new from that post each day, AND they are still seeing awesome OTHER pins because your board is constantly moving with fresh and awesome re-pins.
Also each of those 7 pin images gives you an opportunity to have seven unique pin descriptions targeting different keywords to help drastically improve your chances of being found in the Pinterest search.
Example of an Advanced Cross Pinning Schedule
Remember, that ONE post has SEVEN images, so ALL of the pins below link to that ONE RoundUp post.
It takes a full 7 days to finish this cross pinning for this one blog post.
Monday:
- Image 1 to Board 1
- Image 2 to Board 2
- Image 3 to Board 3
- Image 4 to Board 4
- Image 5 to Board 5
- Image 6 to Board 6
- Image 7 to Board 7
Tuesday:
- Image 1 to Board 2
- Image 2 to Board 3
- Image 3 to Board 4
- Image 4 to Board 5
- Image 5 to Board 6
- Image 6 to Board 7
- Image 7 to Board
Wednesday:
- Image 1 to Board 3
- Image 2 to Board 4
- Image 3 to Board 5
- Image 4 to Board 6
- Image 5 to Board 7
- Image 6 to Board 1
- Image 7 to Board 2
You should keep on rotating the images you post to your boards in that fashion each day.
It will take you a week for each of the 7 boards to each have one of the 7 images from your Round Up post pinned to it…and those pins better be surrounded by great pins/repins from other pinners and sites.
Yes, you CAN do that daily cross-pinning schedule all at one time if you want to and pin an image with that day’s board back to back…that’s fine there’s no need to space them out over the course of that one day. With how Pinterest is these days, it really doesn’t matter.
Tip: Make sure your weekend pins use this repin/cross pinning strategy go out in the mid-afternoon. Saturdays and Sundays are BIG Pinterest activity days so why not take advantage of that?
This is how you get things started and really build momentum for your account and start the traffic to your site from Pinterest. Make a plan to do your Cross Pinning each day and then make time to clean up and edit old posts to make them “Pinteresting”.
Pinning with Purpose
Having developed your Pinterest account successfully, it is time to manage your pins and boards. Well, below are a few tricks to get you along. The most important thing to learn and understand before truly pinning with Purpose is how Pinterest actually works. Every single time a pin or re-pin is made, it makes an entirely new URL (web page on the Pinterest site).
Many people think that when they “re-pin” something they see on Pinterest, they are just adding that exact pin to one of their boards. In reality, when you click anything you see to pin it to one of your boards, it becomes an entirely new web page. Because every pin is tracking a lot of unique stats and data.
Inside the source code (the programming code that makes a pin page happen), you can see that Pinterest is tracking. They include:
- Who re-pinned that pin
- What board that user pinned it to
- What pin description that person used
- How many re-pins that re-pinner received
- The image code
- Where the original pin came from
- What URL the pin is linked to
- Any Rich Pin info tied to that URL
- The original pin description
Remember, the two most important metrics in the code of a pin are:
- How many repins the re-pinner received
- How many TOTAL repins that original pin received
The 2 most important things to know about any pin, is that each pin is tracking:
- The person who pinned it I’ll call that ‘pinner credit.’
- The overall stats of that original pin I’ll call that “pin credit.”
Note: Pinner credit is tracked at the person/Pinterest account level. Pin credit it tracked on the basis of that PIN.
How Pinterest tracks all this
Example: Jennifer, just published a brand new post and pinned an image from it. Since no one has ever pinned that image from that web page before, the stats start at 0 but change once I make that first pin. Even if that image has been on Pinterest before, that image with the URL it links to makes it an original pin that starts with a count of 1. As soon as I pin that image from that URL, the pin shows a 1 next to the pin.
Ok, so now the pin is on Pinterest…. And YOU see it, and re-pin it to one of YOUR boards. That number on the pin now changes to 2 one for my pin, one for your pin (re-pin)
When YOU re-pinned that pin, the pin credit goes to 2 one for my pin and one for yours (PIN credit tracking). AND, I also get a “re-pin” count of 1 (pinner credit). The pin credit is a “2”. The pinner credit is a “1” (for me)
After you re-pinned that pin, “Jim” sees it and he re-pins your pin to his board. Now, the pin will show a 3 (1 for me, 1 for you, and 1 for Jim).
Now, the pin “credits” go as follows: The pin credit is 3 one for my pin, one for your re-pin, and one for Jim’s re-pin of yours. You have a pinner credit of 1 for Jim’s pin. I still only have a pinner credit of 1 (for yours). And Jim has a pinner credit of 0 (his hasn’t been re-pinned by anyone as of yet)

Pinterest tracks YOUR re-pin count (i.e., what happens after YOU pin something) and it tracks everything that has happened since I pinned that original pin. They are basically tracking the strength of the pinner and the strength of anyone who rep-pins that pin.
Once you pin anything (whether it’s a pin from somewhere online or a re-pin of something you see ON Pinterest), your pinner credit stats start counting. If Pinterest has never “seen” that image + that URL, the pin stats start counting as well.
However, if that image + URL has been pinned before, your pinner stats start here, but, the pin credit stats continue based on all other stats Pinterest has for that image + that URL.
You only accumulate Pinner Credits (the re-pins count in the code), when others actually re-pin YOUR pin. It is of the utmost importance to get your pins seen and re-pinned a LOT.
You want that Pin Credit/Aggregated Stats number to get bigger and bigger, so Pinterest sees it as a strong pin for whatever keywords you want it to rank for.
Those that re-pin your pins and make pins from your web pages are precious. If someone repins something of yours (i.e., that leads to YOUR website), for the love of all that is Pinteresting, go re-pin their pin! Get it back out there and recirculate it on Pinterest to your followers and anyone else that might see it.
If that pin lands in front of a Power Pinner and that person likes what they see and re-pins it…That is when the magic happens!
A pin to your web page starts ranking better and better in Pinterest search results. This means more pinners see it (because it’s at the TOP of the search results), so people keep re-pinning it for years to come. This ensures that pin to your web page will rank highly for an indefinite amount of time and will continually send you traffic.
It does not have to do with how many followers you have. It does have to do with getting your pins repinned, so they have a chance to land in front of a Power Pinner.
How Can I See Who Repinned Pins to my Site?
Watch your notifications and look to see anytime someone repins a pin of yours that leads to your site. Re-pin it to a board of yours or at least re-pin it to a secret board for this purpose so you can go in and re-pin it when it feels like it’s losing steam (and change the description if you feel it needs it). You can also see all the pins people made from your SITE.
Start with this URL formation: https://www.pinterest.com/source/
Then add your domain name to the end. For example, if your website is MySite.com, the URL to see all pins made for your site would be:
https://www.pinterest.com/source/mysite.com
It is recommended to look at the Pinterest/source page for your site (or sites) about once a week. When you find a pin someone made from your site, re-pin it first to a specific secret board and then re-pin that pin to a public board.
Every now and then, pop into that secret board and see how those pins are doing and re-pin them to your public boards. Do that whenever, however, and as often as you like. The only real “rule” to pinning the same thing (same image and/or same URL) to the same board multiple times is that your board isn’t full of mainly YOUR pins to YOUR single website.
However, if there is a pin someone else made on that secret board that fits in with more than one of your boards, pin it to both/all boards it is relevant. Don’t stress it pin stuff to your web pages a lot just be mindful to keep OTHER pins moving in your boards, too.
Another nice thing about keeping those pins others made from your site on that secret board is that you can see the things pinners really like from your site. Understanding how Pinterest works AND how to get it to work for you is the most important thing to be able to get the results you want from your Pinterest efforts.
More ‘Golden Nugget Tips’
People have been pinning images from websites for years now. Know what happens online after years have passed? People don’t renew their websites or forget about them, and they lose them, etc. Just for fun, click through some really popular pins you see on Pinterest, especially if Pinterest says that pin was made years ago. If the site is offline see if you can buy that domain name.
If you can buy it, make sure you make a web page on that new site with the exact URL that pin leads to and make a page about what that pin relates to. Even better, put that pin image on that web page. Then do the pinterest.com/source trick to see ALL the pins made from that site.
Here’s another trick…
When your boards start to get big over a 100 pins or more it might be time to start thinking about “nicheing down” that board. This happens a lot with boards that have a more broad topic think like a “Food” board.
One day you look at the board, and it’s over 100+ pins, so you scroll through the pins and see that you have a lot of “appetizer” recipes. So you make a NEW board just for appetizer recipes and move those pins to the new board.
How To “Tell” Pinterest What Image to Use
You may not want all the images pinned. In that case, there are some HTML codes you can add to images on your post that you don’t want to be pinned. For example, blog header images that are wider and shorter or small images. This code allows you to “tell” Pinterest what image to use instead of that nonPinteresting image.
The code looks like this:
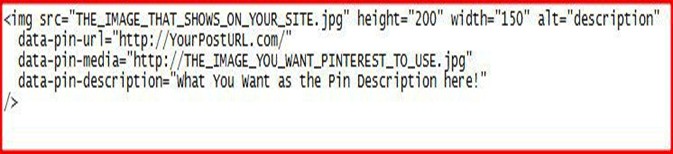
You have your ‘normal’ HTML that makes your post header image show and then, you add in a few extra lines with that pindata stuff. One spot is where you tell Pinterest what the URL is of your post. The middle spot is telling Pinterest what image to use. And the bottom spot is where you tell Pinterest what pin description to use. That’s all it does don’t let it baffle you.
What To Name The New Board?
Go to Pinterest search and type in my main topic of the board. For this example, we’ll use ‘appetizers’. You will see several words in coloured boxes underneath the main search. Those are buttons that you can click to isolate your search results and make it easier to find what you are looking for. Pinterest calls them “Guides” and those Guides are very helpful for us, too.
Pinterest lets you search and see what boards are on Pinterest for your search. It takes a few days for a new board to show in Pinterest search results, but pins show almost immediately.
The 7×7 Pinning Strategy
When you make a post intended for Pinterest or a Pin Round-Up post, make sure you have:
- 7 good “pinnable” images in the content of your post, and
- 7 Pinterest boards to pin those images to.
When 7×7 pinning strategy is completed, all 7 boards will end up will all 7 images pinned to them.
The 7×7 Pinning Schedule
On Day 1: Image 1 pins to Board 1
On Day 2:
- Image 1 pins to Board 2
- Image 2 pins to Board 1
On Day 3:
- Image 1 pins to Board 3
- Image 2 pins to Board 2
- Image 3 pins to Board 1
On Day 4:
- Image 1 pins to Board 4
- Image 2 pins to Board 3
- Image 3 pins to Board 2
- Image 4 pins to Board 1
On Day 5:
- Image 1 pins to Board 5
- Image 2 pins to Board 4
- Image 3 pins to Board 3
- Image 4 pins to Board 2
- Image 5 pins to Board 1
On Day 6:
- Image 1 pins to Board 6
- Image 2 pins to Board 5
- Image 3 pins to Board 4
- Image 4 pins to Board 3
- Image 5 pins to Board 2
- Image 6 pins to Board 1
On Day 7:
- Image 1 pins to Board 7
- Image 2 pins to Board 6
- Image 3 pins to Board 5
- Image 4 pins to Board 4
- Image 5 pins to Board 3
- Image 6 pins to Board 2
- Image 7 pins to Board 1
Day 8
- Image 1 is done it has been pinned to all 7 boards
- Image 2 pins to Board 7
- Image 3 pins to Board 6
- Image 4 pins to Board 5
- Image 5 pins to Board 4
- Image 6 pins to Board 3
- Image 7 pins to Board 2
Day 9
- Image 1 and image 2 are done
- Image 3 pins to Board 7
- Image 4 pins to Board 6
- Image 5 pins to Board 5
- Image 6 pins to Board 4
- Image 7 pins to Board 3
Day 10
- Images 1, 2, and 3 are done
- Image 4 pins to Board 7
- Image 5 pins to Board 6
- Image 6 pins to Board 5
- Image 7 pins to Board 4
Day 11
- Images 1, 2, 3, and 4 are done
- Image 5 pins to Board 7
- Image 6 pins to Board 6
- Image 7 pins to Board 5
Day 12
- Images 1, 2, 3, 4, and 5 are done.
- Image 6 pins to Board 7
- Image 7 pins to Board 6
Day 13
- Images 1, 2, 3, 4, 5, and 6 are done.
- Image 7 pins to Board 7
Day 14 7×7 Pinning is complete.
Then check to see how re-pins are going and cross pin any re-pins from others to relevant boards. But, you MUST have other pins being added to those 7 boards while this is going on.
What If I don’t Have 7 Boards to Cross Pin To?
No big deal… you can do 5 boards or 3 boards… whatever works for you at that time. In short, you’ll be spreading your pins out by at least 20 24 hours apart and rotating so each of the 7 images ends on all of the boards you have for this topic.
Using Group Boards for a 7×7
If the Group Board does not move very quickly with new pins from other members, you could be seen as “spamming the board” with too frequent pins to the same URL.
Here’s Another Useful Pinterest Tip….
Every Pinterest Account and Every Pinterest Board has its own RSS feed. To access the RSS feed of an entire Pinterest Account: Take the Pinterest profile URL: https://www.pinterest.com/involvery/
Then add feed.rss to the end like this: https://www.pinterest.com/involvery/feed.rss
To access the RSS feed of an individual Pinterest BOARD Take the Board url: https://www.pinterest.com/involvery/backtoschool/
Then REMOVE the last trailing slash and add “.rss” to the end… like this: https://www.pinterest.com/involvery/backtoschool.rss
One Last Golden Nugget Tip
It is highly recommend to spend a little time of the Pinterest Mobile App. At least half of all Pinterest traffic is from mobile devices and things are not exactly the same when using Pinterest from your phone.
Once you see your pins, descriptions and boards on a PHONE, it will open your eyes as to how you can pin better.
Pinterest Niche Board
A niche board is a type of board you reserve when you have a good bit of content of various places online about one topic/niche and you already know that niche converts well for you
It is not something you experiment with- it is a Board you make because you already know the content you have online relevant to that topic converts for you….and you want more traffic to those pages.
Each pin description is edited/crafted to tackle one specific keyword that people use to search Pinterest in relation to your Niche Board Topic
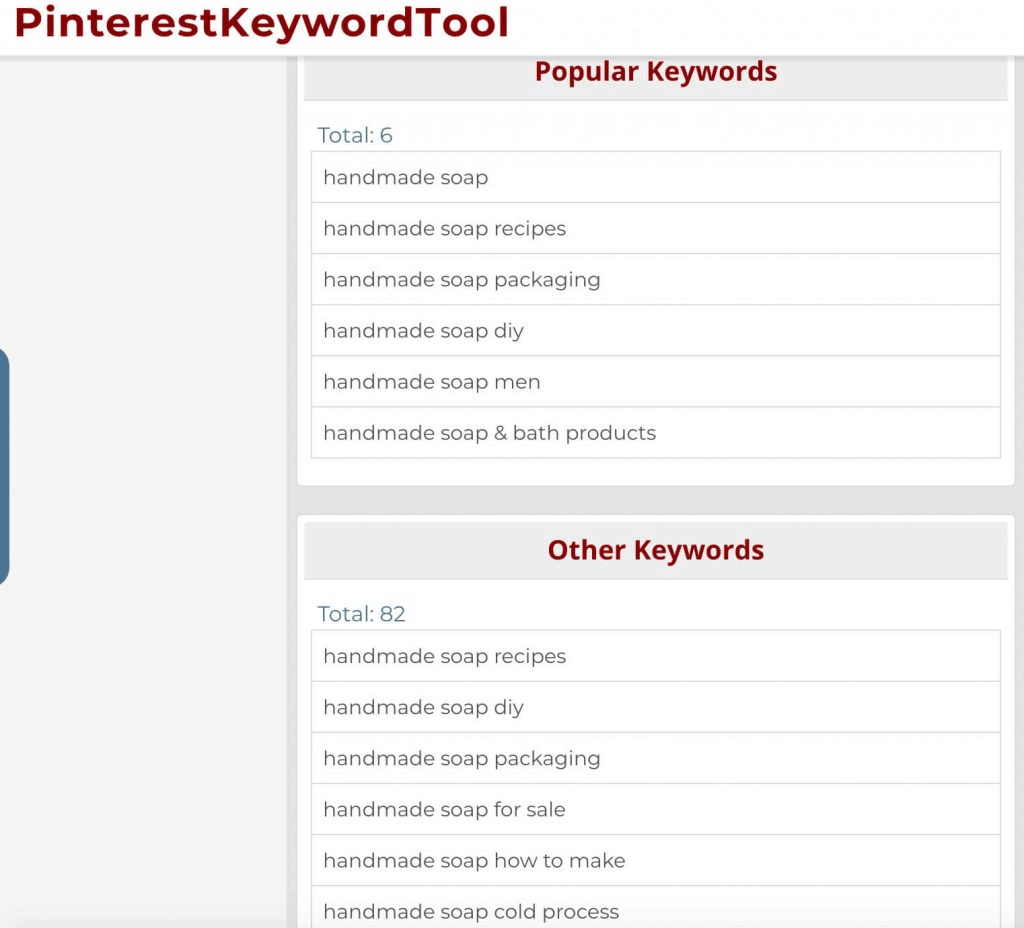
How To Easily Find the Keywords to use
To find the best keyword to use in your niche board,
- Type some words about your niche to get started
- Start clicking the keyword filter that Pinterest offers
- Head over to the Pinterest Keyword Tool
- Look back to the result On the Pinterest Keyword Tools and look at the related Keyword List
- Take the List and start from the start
- Take the first phrase and match to a piece of content you have online that matches enough and pin it making sure that the keyword phrase is in the pin description
- Be sure you have descent images to pin-crappy images rarely get any results on Pinterest
Important Tips:
- Do not make it look spammy
- Type more than just that keyword phrase
- Don’t make that your full pin description
- Make it human-readable sentence not keyword stuffed non-sense
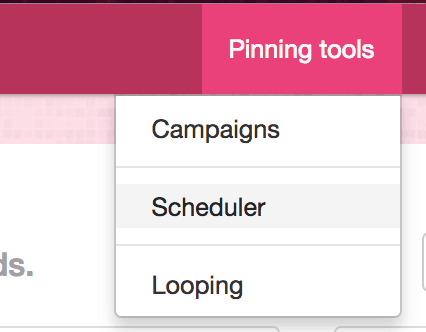
Once you have about 25-30 or so pins on that Niche Board. Then set up “Looping” for it using this tool: http://www.potpiegirl.com/boost.
Looping– is an automated process this tool does. When a board is set up for “Looping” the tool takes the pin at the bottom of the board and re-pins it to the top of the board. The tool then waits a certain amount of days that you choose to then come back and compare the two pins ( one at the bottom and one at the top) and delete the lesser-performing pin(if you want it to…and with small boards , yes do you want it to)
You can still add new pins to your Niche Board –and that’s a great idea – but “Looping” keeps your board moving and always has new pins that have another chance to get out there and do good stuff for your web pages.
Niche board crucial ideas
Niche board usually do not get a lot of Re-pins- but they got a lot of click through the web page. Therefore, don’t go crazy deleting pins because you think they aren’t doing anything for you.
Always check your site stats to which pins are driving traffic and never ever delete them. You should also watch you traffic stats and be highly aware of pins that are sending traffic you.
Pinterest Pin/ Content Planning Calendar
Ideally, internet marketers wants to be two months ahead of a holiday shopping season
Example: If you plan to promote Halloween costumes and other Halloween things, you need to be getting that content online and pinned starting the end of August. Pinterest gives many “clues” as to what is popular or trending. They include;
- There is “popular” category in Pinterest https://www.pinterest.com/categories/popular/
- Pinterest also sends messages with “news” in your message area
- At any given time, you can click your mouse in the Pinterest search bar and see what is trending right at the moment on Pinterest:
- Pinterest also sends out emails now and then with timely search trends
- Pinterest also shares weekly search VOLUME for those topics in those as well
- Another place to get ideas and find Pinterest trends is the Pinterest blogs https://business.pinterest.com/en/blog or https://blog.pinterest.com/en
They may not only share things trending on Pinterest but they also share tips in this category: https://blog.pinterest.com/en/tags/tips. Certainly, there is no shortage of places to get ideas for content that should do very well on Pinterest.
Case in Point – Pinterest Tips For T-shirt Creator/Affiliates
Shirts are certainly one of the most fun things to promote online because everyone loves a shirt. Pinterest works very well for promoting your shirt if you know how to do it properly
Things to be remember:
- Do not only pin images on your shirt
- Collect Audience
- Don’t get too broad with the topic though- when you try to appeal to everyone you end up appealing to no one.
MOCK UPS- are little tools that take your shirt design and put them on people wearing the shirt. This is a free online mock-up generator tool that can be used quite often https://placeit.net/c/apparel
Pinterest does offer paid ads for pins. They’re called Promoted Pins-it gets re-pins and likes during its paid promotion and those stats stay with the pin after the ad is over The traffic isn’t very expensive, but unlike Facebook ads, the traffic from promoted pins does not stop once the ad is over or is turned off.
Teaching the paid promoted pins is way outside the scope of the Pinterest Training, but it is definitely something worth mentioning and absolutely something to keep in mind to try once you have an organic pin that works really well.
The post titles and Pinterest pin description are not optimized with keywords at all. They are just little funny/quickly saying about this picture. Use Pinterest Boards to collect people (i.e, your target audience) by sharing things they want to see- don’t make the mistake thinking people will follow a board that just share pictures of random shirts.
Use the Pinterest Keyword Tool to help you find the words or phrases people are using to search on Pinterest for things related to your shirt. People would much rather buy a shirt from a real person who shared it with them than buy it from an obvious marketer.
Pinterest Frequently Asked Questions

As a starter, there are quite a lot you might not be aware of. Below is a roundup of some of the common questions asked by users seeking to know more of Pinterest growth tips.
My Blog is a MESS! How Do I Know Where To Start?
Start by cleaning them up first, then the next 5 best performing posts etc.
How Long Will It Take To See Traffic From My Pins?
On average, it takes about 57 days for a pin to “simmer” in and start getting attention and action but don’t be upset if it takes 10 days or 2 weeks. That’s still normal. Like Google, it takes the Pinterest algorithm a few days to get things to ‘simmer’ together, but once it does you’re good for…well, forever!
How Do You Monetize These RoundUp Posts?
You can monetize these RoundUp posts with affiliate links just like any other post.
RoundUp Post Strategy Recap:
Having gone through the guide above, you must have noted the following essential Pinterest growth tips.
- Think of an idea and then add pins to a secret board to gather those ideas in one place.
- Go make a big Pinterest image and Facebook image for that post.
- Upload both the Pinterest image and the Facebook image to your site thru the media tab in your wpadmin area.
- Copy your RoundUp post template HTML and paste it into a new post.
- Fill in and replace everything in that template.
- Publish the post and make sure everything looks and works properly.
- Get post URL and go add it to the proper place in the pin data code in your post. Republish.
- Pin to your main Blog Board then embed that pin in your post where it says to and set up cross pinning. (can also pin different images to different related boards at this time.)
- Make a note on your calendar of when to cross pin which image if doing cross pinning manually or note when that cross pinning campaign will be done if using a pinning tool.
- Share on Facebook. Tweet on Twitter. Share anywhere else that you normally would.
- While there are good strategies, there really isn’t a WRONG way to use Pinterest. But, there are better ways to use it to help you get better results.
- Don’t try and “micromanage” your Pinterest account. Make sure your account is doing what it needs to be doing and then let it be. Go work on something else until it’s time to pin or schedule pins again.
- Use tools when they make sense for you to use them and/or when you are really on limited time for online work.
- Pin at least 23 pins per day per board per day. Keep all your boards moving and remember to “surround yourself with greatness” by re-pinning really great pins to your boards that people that follow your board will love.
Lastly, pay a lot of attention to any pin you see that has a lot of re-pins analyze it quickly. What did they do with the image? How is their pin description? Heck, click through and look at the web page they linked their pin to. Go look at their ACCOUNT and see how they pin things and organize/title their boards.